Moving to Borgbackup

I used to have a quite complicated backup setup, involving macOS Time Machine, rsync, shell scripts, ZFS snapshots, pefs, local disks, a server on the LAN, and a server 450 km away. It was working great but I've felt like I could use a unified system that I could share across every systems and that would allow me to encrypt data at rest.
Pure ZFS was a no-go: snapshot send/receive is very nice but it lacks encryption for data at rest (transfer is protected by SSH encryption) and macOS doesn't support ZFS. Rsync is portable but does not offer encryption either. Storing data in a pefs vault is complicated and works only on FreeBSD.
After a while, I've decided that I want to be able to store my encrypted data on any LAN/WAN device I own and somewhere on the cloud of a service provider. I've read about BorgBackup, checked its documentation, found a Borg repository hosting provider with a nice offer, and decided to give it a try.

This is how I've started to use Borg with hosting provider BorgBase.

Borg is quite simple, even though it does look complicated when you begin. BorgBase helps a lot, because you are guided all along from ssh key management to creation of your first backup. They will also help automating backups with a almost-ready-to-use borgmatic config file.

Borg is secure: it encrypts data before sending them over the wire. Everything travels inside an SSH tunnel. So it's perfectly safe to use Borg in order to send your backups away in the cloud. The remote end of the SSH tunnel must have Borg installed too.

Borg is (quite) fast: it compresses and dedup data before sending. Only the first backup is a full one, every other backup will send and store only changed files or part of files.

Borg is cross-plateform enough: it works on any recent/supported macOS/BSD/Linux.

Borg is not for the faint heart: it's still command line, it's ssh keys to manage, it's really not the average joe backup tool. As rsync.net puts it: "You're here because you're an expert".

In the end, the only thing I'm going to regret about my former home-made backup system was that I could just browse/access/read/retrieve the content of any file in a backup with just ssh, which was very handy. With Borg this ease of use is gone, I'll have to restore a file if I want to access it.

I won't detail every nuts and bolts of Borg, lots of documentation exists for that. I would like to address a more organizational problem: doing backups is a must, but being able to leverage those backups is often overlooked.
I backup 3 machines with borg: A (workstation), B (home server), C (distant server). I've setup borgmatic jobs to backup A, B and C once a day to BorgBase cloud. Each job uses a dedicated SSH key and user account, a dedicated Repository key, a dedicated passphrase. I've also created similar jobs to backup A on B, A on C, B on C (but not Beyoncé).
Once you are confident that every important piece of data is properly backed up (borg/borgmatic job definition), you must make sure you are capable of retrieving it. It means even if a disaster occurs, you have in a safe place:

  • every repository URIs
  • every user accounts
  • every SSH keys
  • every repository keys
  • every passphrases

Any good password manager can store this. It's even better if it's hosted (1password, dashlane, lastpass, etc.) so that it doesn't disappear in the same disaster that swallowed your data. Printing can be an option, but I would not recommend it for keys, unless you can encode them as QRCodes for fast conversion to digital format.

You must check from time to time that your backups are OK, for example by restoring a random file in /tmp and compare to current file on disk. You must also attempt a restoration on a different system, to make sure you can properly access the repository and retrieve files on a fresh/blank system. You can for example create a bootable USB drive with BSD/Linux and borg installed to have a handy recovery setup ready to use in case of emergency.

Consider your threat model, YMMV, happy Borg-ing.
Related posts

Recherche Administratrice/teur Systèmes en alternance

Au sein du Service Opérations de la DSI de l'Université Lyon 2, nous cherchons un ou une Administrateur/trice Systèmes en alternance pour nous aider à relever des défis au quotidien.
Lieu de travail : campus de Bron (arrêt de tram T2 Europe Université).

  • Vous habitez la région Lyonnaise ;
  • Vous êtes motivée par les enjeux de la gestion d’un parc de plus de 400 serveurs Linux RedHat/CentOS (70%), Windows, FreeBSD ;
  • Les problématiques d’une ferme de virtualisation multi-site avec balance de charge, PRA, sauvegardes croisées ne vous font pas peur ;
  • Les infrastructures à fort enjeu de disponibilité, les outils d’automatisation, de monitoring et les SIEM vous intéressent ;
  • Vous êtes passionnée par les problématiques système et souhaitez évoluer dans un environnement riche et varié ;
  • Vous êtes curieuse, très rigoureuse et vous avez le sens du service.

Si vous vous reconnaissez dans ce profil, contactez-moi !

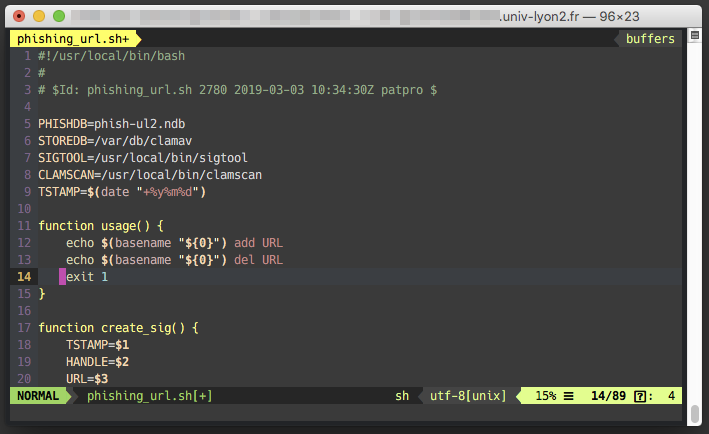
terminal - édition d'un script shell

Édition d'un script shell dans le terminal

Related posts

Install Fast Incident Response (FIR) on FreeBSD

FIR login screen FIR is a web application designed by CERT Société Générale. It's coded in Python and uses Django.

Installation as documented uses Nginx and pip, two tools I'm not using. I already run several Apache servers, and I do prefer relying on pkg for software installation. For me, pip is more a developer tool: very convenient with virtualenv but not what I would use for production.
If you want to use pip, just go with the official documentation :)

So on a FreeBSD 11.2-RELEASE server, you need to install all required packages. Be careful, py27-MySQLdb uses mysql56-server, not mysql57-server, and FIR works with Python 2.7, not 3.x (as far as I can say).

$ sudo pkg install gettext mysql56-server py27-pip py27-virtualenv git apache24 uwsgi py27-MySQLdb py27-django py27-cssselect py27-django-filter py27-djangorestframework py27-flup6 py27-gunicorn py27-lxml py27-markdown py27-pymongo py27-pyquery py27-dateutil py27-pytz py27-six py27-django-treebeard py27-markdown2 py27-bleach py27-python-gettext

Add those lines to /etc/rc.conf:

mysql_enable="yes"
uwsgi_enable="yes"
apache24_enable="yes"

The requirement list includes dj-database-url and whitenoise, but I was not able to find them in FreeBSD's packages. I've just ignored them and everything seems to work fine.
If needed, sudo pip install… should do the trick.

Follow the documentation:
- configure MySQL
- install FIR without virtualenv (in /usr/local/www for example)
- create and tune production.py
- create installed_apps.txt (you do want the plugins)
- create tables in the db
- create the admin user
- populate the db
- collect static files

On FreeBSD we run uwsgi as a service, under uwsgi UID. So chown must reflect that:

$ sudo chown uwsgi logs/errors.log uploads
$ sudo chmod 750 logs/errors.log uploads

Skip the uWSGI section of the documentation. Instead, create config file for uwsgi with this content:

$ cat /usr/local/etc/uwsgi/uwsgi.ini
[uwsgi]
chdir = /usr/local/www/FIR
module = fir.wsgi

You can now start the service:

$ sudo service uwsgi start

Then, skip the nginx part, and go configure Apache:

- load proxy_module and proxy_uwsgi_module in httpd.conf
- add the following to the relevant part of Apache configuration:

# FIR
ProxyPass /FIR unix:/tmp/uwsgi.sock|uwsgi://usr/local/www/FIR
Alias /files/ /usr/local/www/FIR/files/
Alias /static/ /usr/local/www/FIR/static/
<Directory /usr/local/www/FIR/static>
	Require all granted
</Directory>
<Directory /usr/local/www/FIR/files>
	Require all granted
</Directory>

Restart Apache: you're all set, point your browser to https://your-server/FIR/

Related posts

Self-hosted password manager: installing Passbolt on FreeBSD

Arthur Duarte CC-BY-SA-4.0

Arthur Duarte CC-BY-SA-4.0

Password managers, or password safes, are an important thing these days. With the constant pressure we (IT people) put our users under to setup a different password for every single registration/application/web site, it's the best, if not only, way to keep track of these secrets. On one hand, the isolated client-side software can be really powerful and/or well integrated with the OS or the software ecosystem of the user, but it lacks the modern touch of "cloud" that makes your data available anywhere and anytime. On the other hand, a full commercial package will come with client for every device you own, and a monthly fee for cloud synchronization, but you have absolutely no control over your data (just imagine that tomorrow the company you rely on goes bankrupt).
Better safe than sorry: I don't rely on cloud services. It comes at a cost, but it's quite rewarding to show the world another way exists.
Disclaimer: I don't give a sh*t about smartphones, so my needs are computer-centric.

In order to store passwords, and more generally speaking "secrets", in such a way that I can access them anywhere/anytime, I've tried Passbolt. Passbolt is an OpenSource self-hosted password manager, written in PHP/Javascript with a database back end. Hence, install and config are not for the average Joe. On the user side it's quite clean and surprisingly stable for alpha software. So once a LAMP admin has finished installing the server part, any non-skilled user can register and start storing passwords.

Enough chit-chat, let's install.

My initial setup was a vanilla FreeBSD 10.3 install, so I've had to make everything. I won't replay every single step here, especially on the configuration side.

Prerequisites:

pkg install apache24
pkg install mod_php56
pkg install php56-gd
pkg install pecl-memcached
pkg install mysql57-server
pkg install pecl-gnupg
pkg install git
pkg install php56-pdo_mysql
pkg install sudo
pkg install php56-openssl
pkg install php56-ctype
pkg install php56-filter

Everything else should come as a dependency.

Tuning:

Apache must allow .htaccess, so you'll have to put an AllowOverride All somewhere in your configuration. You must also load the Rewrite module. Also, go now for SSL (letsencrypt is free and supported). Non-SSL install of Passbolt are for demo purpose only.
Apache will also need to execute gnupg commands, meaning the www user needs an extended $PATH. The Apache startup script provided on FreeBSD sources Apache environment variables from /usr/local/sbin/envvars and this very file sources every /usr/local/etc/apache24/envvars.d/*.env, so I've created mine:

$ cat /usr/local/etc/apache24/envvars.d/path.env
PATH=/sbin:/bin:/usr/sbin:/usr/bin:/usr/games:/usr/local/sbin:/usr/local/bin

You also need to tune your MySQL server. If you choose the 5.7, you must edit it's configuration. Just add the following line into [mysqld] section of /usr/local/etc/mysql/my.cnf:

sql_mode = 'STRICT_TRANS_TABLES,NO_ZERO_IN_DATE,NO_ZERO_DATE,ERROR_FOR_DIVISION_BY_ZERO,NO_AUTO_CREATE_USER,NO_ENGINE_SUBSTITUTION'

This is due to a bug in Passbolt and could be useless in a not to distant future.

Install recipe:

You can now follow the install recipe at https://www.passbolt.com/help/tech/install.
Generating the GPG key is quite straightforward but you have to keep in mind that Apache's user (www) will need access to the keyring. So if you create this key and keyring with a different user, you'll have to mv and chown -R www the full .gnupg directory somewhere www can read it (outside DocumentRoot is perfectly fine).

Use git to retrieve the application code into appropriate path (according to your Apache config):

cd /usr/local/www
git clone https://github.com/passbolt/passbolt.git

Edit php files as per the documentation.

Beware the install script: make sure you chown -R www the whole passbolt directory before using cake install.
On FreeBSD you won't be able to use su to run the install script, because www's account is locked. You can use sudo instead:

sudo -u www app/Console/cake install --no-admin

Same for the admin account creation:

sudo -u www app/Console/cake passbolt register_user -u patpro@example.com -f Pat -l Pro -r admin

Follow the end of the install doc, and you should be ok. Install the Firefox passbolt extension into your browser, and point to your server.

I'm pretty happy with passbolt so far. I'll have to install a proper production server, with SSL and all, but features are very appealing, the passbolt team is nice and responsive, and the roadmap is loaded with killing features. Yeah BRING ME 2FA \o/.

Related posts

Escaping the Apple ecosystem: part 3

In part 2, I was able to create and use a Windows 7 VM with the Radeon R9 270x in passthrough. It works really great. But OSX and Linux where more difficult to play with.

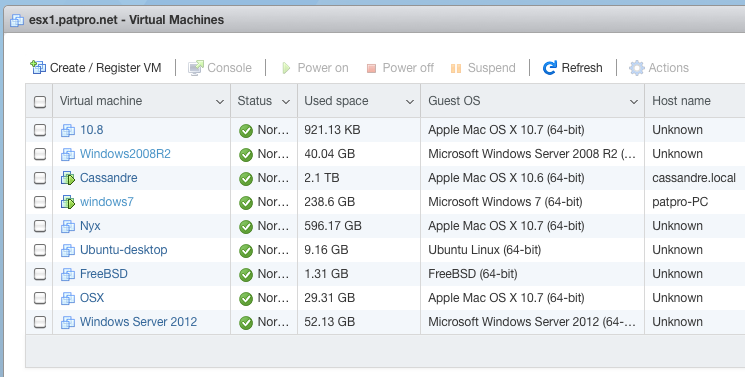
List of virtual machines

List of virtual machines


Since then, I've made tremendous progress: I've managed to run an OSX 10.11.6 VM properly, but more importantly, I've managed to run my native Mac OS X 10.6.8 system as a VM, with the Mac's Radeon in passthrough.
I've removed my Mac OS X SSD and the Mac's graphics card from the Mac Pro tower, and installed them into the PC tower. Then I've created the VM for the 10.6.8 system, configured ESXi to use Mac's Radeon with VT-d, etc.
The only real problem here is that adding a PCI card into the PC tower makes PCI device numbers change: it breaks almost every passthrough already configured. I had to remake VT-d config for the Windows VM. Apart from that, it went smoothly.
Currently, I'm working on my native 10.6.8 system, that runs as a VM, and the Windows VM is playing my music (because the Realtek HD audio controller is dedicated to the Windows VM).
Moving from a Mac Pro with 4-core 2.8 GHz Xeon to a 6-core 3.5 GHz Core i7 really gives a boost to my old 10.6.8 system.

Running both OSes, the box is almost as silent as the Mac Pro while packing almost twice as more raw CPU power and 2.7x more GPU power.

The Mac Pro is now empty: no disks, no graphics card, and will probably go on sale soon.

to-do list:

  • secure the whole infrastructure ;
  • install 2nd-hand MSI R9 270x when it's delivered ;
  • properly setup Linux to use AMD graphics card.

I might also add few SSDs and a DVD burner before year's end.

Related posts

Escaping the Apple ecosystem: part 2

In part 1, I've written about the BoM of my project and the associated to-do list.
First item on this list was: build the box. That did not go as smoothly as expected. The motherboard was not fully operational: after few minutes of run time (between 5 and 30), it would trigger a CPU overheat alarm, even when the CPU was idle and cool. Supermicro's Support made me tried a new BIOS, with no effect, so I've finally send the board for exchange. The new board arrived but I've had to delay the rebuilt for few weeks.
Now the PC is up and running. The new motherboard seems to work great, but I've not tested IPMI yet. IPMI was the very first feature I've used on the first board, and there is a slight probability that the CPU overheat problem comes from a probe malfunction related to the BMC. Let's keep that for later.

I've chosen to run this box on VMware ESXi 5.5, because it's quite common (more than the latest 6.x), because it sports features I need like passthrough, and because most VMware based multi-sit PC projects like mine are using ESXi 5.x.

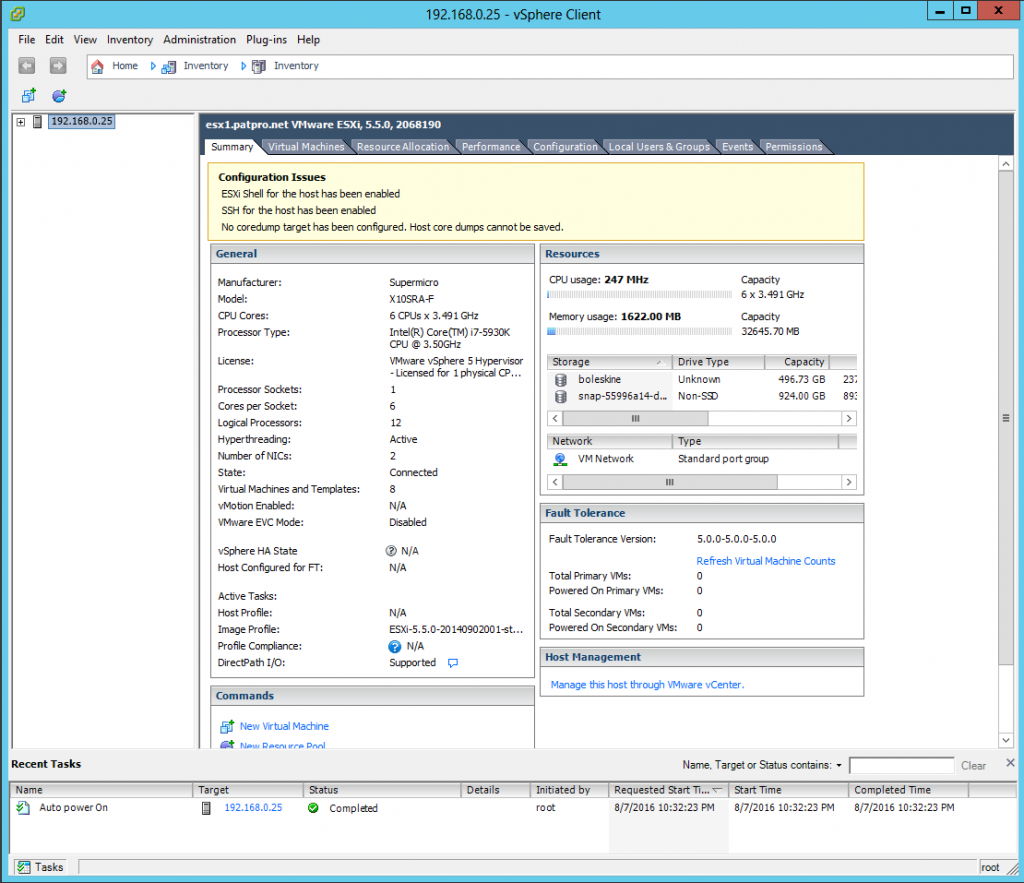
ESXi is quite easy to install, I won't give details. Main hdd in the box is installed with ESXi, which is configured thanks to a USB keyboard and a display plugged in the VGA port of the motherboard. After basic configuration (network, user password...), I've switched to remote configuration through VSphere Client, installed on a Windows PC (really a VM running on the Mac).

General view

General view of ESX's configuration


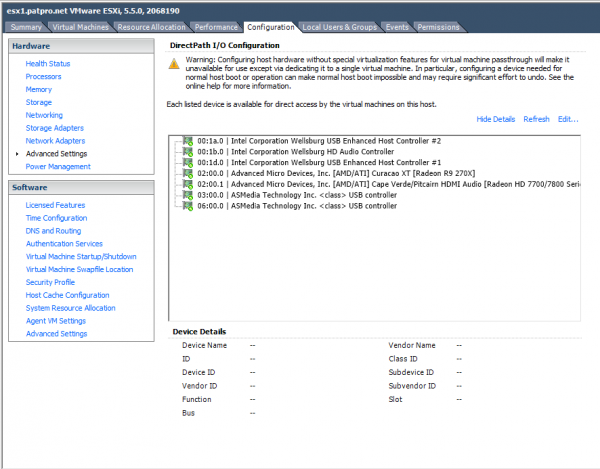
Configuring passthrough for GPUs is pretty straightforward, because I've started with only one GPU, and because these are discrete PCI cards. On the other hand, passthrough of USB controller can be tricky: many controllers, nothing to identify them except trial & error (unless you have the blueprint for your motherboard telling what physical USB ports belong to what controller).
Go to configuration tab, then "Advanced", and finally click "edit" on the right

Go to configuration tab, then "Advanced", and finally click "edit" on the right


When you click "Edit…" a window opens that lists interesting devices you can try to passthrough.
Choose some. Then you have to reboot the ESXi and add some of these devices to a VM.
passthrough
I've created a Windows 7 pro 64bits VM, with raw device mapping pointing to an SSD. I've added every available PCI devices to this VM (USB, sound, GPU) and installed Windows plus updates.
It's important to remember that initially, most PCI devices might not work at all because of missing drivers on guest OS (here it's Windows). Hence, after installing Windows, the Radeon was detected but not used, and only Intel USB controllers where working. I've installed AMD drivers, and ASMedia drivers (courtesy of Supermicro). I've also installed VMware Tools.
After all this, the Windows VM properly uses my Dell display hocked-up on the MSI R9 270x Radeon, and I can interact with the system thanks to a real keyboard and mouse. Passing through the whole USB controller allows me to use any USB device I want. I've successfully plugged-in and used a thumbdrive, a USB gaming headset and a USB hub.
I've made some GPU/CPU benchmarks and everything looks perfect. I've tested Left 4 Dead 2 game play, and it looked great too (I'll probably have to tweak anti aliasing settings to make it perfect).

The Windows part was quite fast to setup, and is almost done now. I've started to fight with OSX and Ubuntu, but things are not easy with both of them. It looks like my 3 years old graphics card it so new that OSX does not support it until 10.11.x, and Ubuntu won't allow me to install Radeon drivers on 16.x LTS because they wait for some software to stabilize before packaging it…

To-do list:

  • fix problems with OSX and Ubuntu virtualization
  • find another MSI Radeon R9 270X GAMING 2G (of course it's no longer in stock…)
  • fully test Mac OS X 10.6.8 with Mac's graphics card instead of MSI Radeon
Related posts

Escaping the Apple ecosystem: part 1

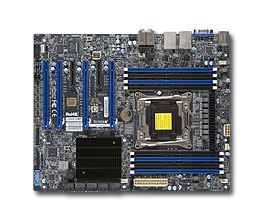
X10SRA-F_specBack in late 2012, I've started to think about my post-Apple days. I knew already that I would not endorse the full cloud crap, and the oversimplification of OS X that follows the iOS convergence. My hardware, my OS, my data.

I'm still running a Mac Pro 2010, with Mac OS X 10.6.8, the last great OS from Apple. Unfortunately (in)security is not what it used to be, and browsers, ssl libraries, etc. are updated frequently and older OSes are no longer supported. So it was time to switch away from 10.6.8 for my online activities. Meaning, it's time to create my multi-headed workstation running various OSes with dedicated GPU.

After about a year spent looking for the right pieces of hardware, I've came up with this BOM:

Hopefully it will yield to great results with virtualization, passthrough of GPUs and USB.
For now, only one GPU, just in case it's not working accordingly. That will allow me to test every OSes I want to use with GPU passthrough. I'll buy 2 more GPUs when it's fully tested and satisfactory.

To do list:

  • Assemble the workstation
  • Install and patch VMWare (to allow the virtualization of Mac OS X on non-Apple hardware)
  • Test each VM with GPU+USB+Sound passthrough

Due to the exotic nature of some of these pieces of hardware, I've had to order them from four retailers in two countries: Amazon (France), LDLC (France), PC-Cooling (Germany) and MindFactory (Germany).

I've got only one delivery problem, for the PC case: it was delivered through GLS Group, and it took them more than a week to drive 10 km from their warehouse to my home. When it finally went through my door, the box was trashed and the PC case had one foot slightly hammered into the case. It can't stand still on its 4 feet.
Whatever you buy abroad, just make sure it won't be delivered through GLS. The driver was a pain in the ass, calling me to delay the delivery.

Related posts

Monter un serveur d’authentification multifacteur 3/3

insertedDans deux articles précédents j'ai présenté la création d'un serveur de validation YK-VAL et d'un serveur de clé YK-KSM permettant de créer une infrastructure d'authentification double facteur basée sur Yubico OTP.
Dans ce dernier article je vais détailler quelques étapes importantes pour connecter un client, toujours en FreeBSD 10.3. Dans ce contexte, le client est en fait un service authentifié (un serveur sshd par exemple).

Prérequis

À ce stade, posséder une Yubikey dont vous pourrez configurer un des slots est impératif. Il est aussi pertinent de télécharger sur votre poste le Yubikey Personalization Tool. Et il vous faut bien évidemment une machine sous FreeBSD 10.x qui servira de serveur sshd.

Générer une clé d'API

La validation d'une authentification par OTP Yubico requière que l'utilisateur fournisse un OTP reconnu, c'est à dire que sa Yubikey soit enregistrée dans le YK-KSM, et que l'OTP envoyé soit valide. Il est aussi nécessaire que la connexion entre le client (ici sshd+pam) et le serveur YK-VAL soit "authentifiée" par une clé d'API.

Dans l'idéal, chaque client individuel doit disposer de sa propre clé d'API, c'est plus sûr. Et même si cela peut occasionner des lourdeurs, cela permet de révoquer une clé d'API sans mettre par terre l'ensemble des clients.

La première étape pour ajouter un client dans l'infrastructure est donc de créer une clé d'API. Pour cela, il faut se connecter sur le serveur YK-VAL, et lancer la commande suivante :

ykval-gen-clients --urandom --notes "client de test 1"
1,VI5eTtCSAjdmp473G3rWFq+pL1k=

Cette commande vous donne en résultat une clé d'API, associée au client "1". La clé d'API et les informations connexes sont injectées dans la base de données du serveur YK-VAL.

Enregistrer une Yubikey

Chaque Yubikey compatible Yubico OTP dispose de deux slots de configuration. Le premier est réglé par défaut sur Yubico OTP, mais il est impossible d'en extraire la clé privée de chiffrement (configuration d'usine). Cette clé est enregistrée dans le YK-KSM des serveurs yubico.com, donc elle est opérationnelle si vous souhaitez l'utiliser pour vous authentifier sur des services qui s'appuient sur le cloud de yubico.com. Nous souhaitons nous appuyer sur notre propre infrastructure privative, donc cette clé n'est pas utilisable.
Si vous souhaitez conserver cette clé initiale, vous devrez créer une nouvelle clé privée sur le slot 2 de votre Yubikey (et je vous y encourage). Si vous êtes sûr de ne pas en avoir l'usage, vous pouvez simplement écraser le slot 1 de la Yubikey avec votre nouvelle clé privée. Sachez que l'écrasement d'un slot est irréversible : la clé privée fournie par Yubico sera définitivement perdue.

Ceci posé, vous pouvez connecter votre Yubikey à votre machine, et lancer le Yubikey Personalization Tool.
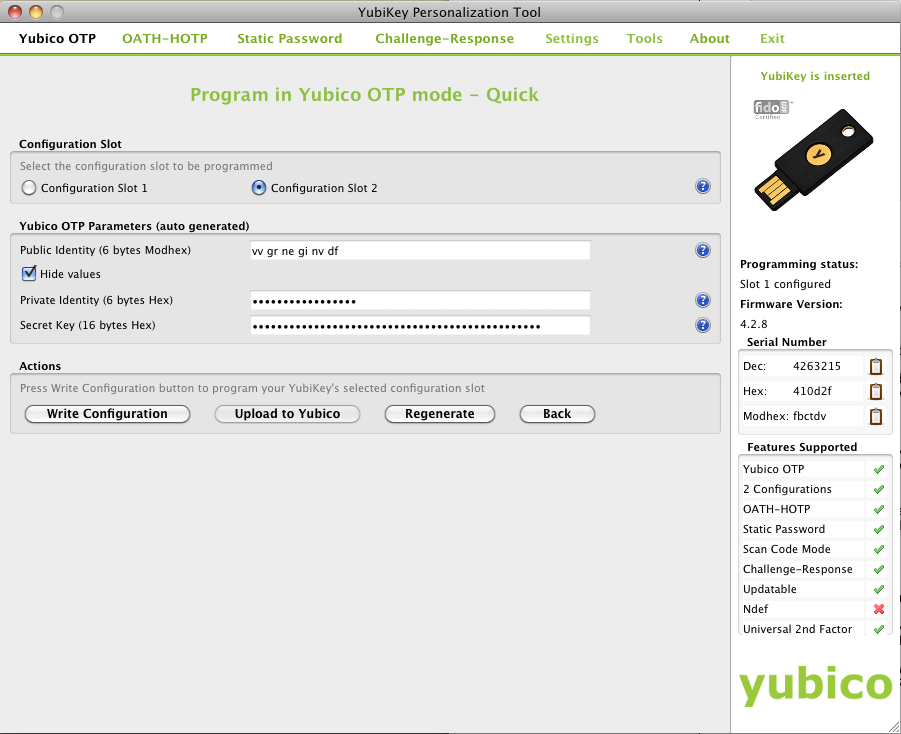
Dans l'interface, choisissez le premier onglet en haut à gauche "Yubico OTP", et cliquez sur "Quick".
La fenêtre ci-dessous est affichée :
- choisissez le slot 1 (écrasement de la configuration d'usine) ou le slot 2 (vierge)
- décochez la case "Hide values"
- copiez précieusement les chaînes de caractères des trois champs, ainsi que le serial number au format décimal ("Dec") qui se trouve au milieu à droite de la fenêtre.

Yubico Personalization Tool

Il s'agit ensuite d'enregistrer ces informations dans la base de données du YK-KSM. Dans le cadre de ces tests, j'ai simplement injecté la clé à la main dans MySQL :

INSERT INTO yubikeys VALUES (4263215,"vvgrneginvdf","","578fba7ca791","fd69d1ecc644f36dde9dfc742cf2e3fa","00000000","",1,1);

Les champs sont dans l'ordre d'apparence : le numéro de série "Dec" de votre clé physique, la date de création (non renseignée), la "Public Identity" de votre clé de chiffrement, la "Private Identity" de votre clé de chiffrement, et enfin la "Secret Key". Les champs suivants sont "lockcode", "creator" (vide), "active" et "hardware". Laissez-les simplement comme présenté ci-dessus.

Dès que vous avez procédé à l'insertion, vous pouvez tester que la clé est bien reconnue par le serveur YK-KSM. Générez un OTP avec votre clé en appuyant un court instant sur le bouton si vous utilisez le slot 1, ou 2-3 secondes si vous utilisez le slot 2 (placez au préalable votre curseur dans un document txt).
Ensuite tapez la commande suivante sur le serveur YK-KSM :

curl 'http://localhost/wsapi/decrypt?otp=vvgrneginvdfddffbdhgefnrdtgcrnntccchndebhdiv'

ou vvgrneginvdfddffbdhgefnrdtgcrnntccchndebhdiv est l'OTP que vient de générer votre clé.
Vous obtiendrez alors la réponse suivante :

OK counter=0001 low=8250 high=45 use=02

Vous pouvez ensuite tester que votre Yubikey passe bien la validation de bout en bout. À partir d'un terminal sur YK-VAL, lancez la commande suivante :

ykclient --url "http://127.0.0.1/wsapi/2.0/verify" --apikey VI5eTtCSAjdmp473G3rWFq+pL1k= 1 vvgrneginvdfihrudhtffnjigivctkujtfjlkiniideg --debug

L'argument --apikey doit être suivi de la clé d'API que vous avez générée plus haut. Elle est suivit d'un espace, puis du numéro d'ID du client que vous avez inséré (et donné dans la sortie de la commande ykval-gen-clients). À la suite de ce client ID, on injecte un OTP, et éventuellement l'argument --debug.

Si tout va bien, vous devez obtenir dans la sortie :

Input:
  validation URL: http://127.0.0.1/wsapi/2.0/verify
  client id: 1
  token: vvgrneginvdfihrudhtffnjigivctkujtfjlkiniideg
  api key: VI5eTtCSAjdmp473G3rWFq+pL1k=
Verification output (0): Success

Configuration du client

Pour brancher un serveur sshd sur une infrastructure d'authentification double facteur, le plus simple est en général d'utiliser un plugin PAM. Sur FreeBSD, on peut en quelques secondes installer le nécessaire :

pkg install pam_yubico

Ce plugin s'appuie sur deux choses : l'URL de votre service YK-VAL, et une liste qui associe les logins des utilisateurs avec une clé ("Public Identity").
Vous pouvez créer le fichier qui associe l'uid UNIX à la "Public Identity" très simplement :

cat "patpro:vvgrneginvdf" >> /etc/yubikey

Puis dans /etc/pam.d/sshd il faut ajouter la directive qui permettra à PAM de faire la requête vers YK-VAL. La ligne suivante doit être ajoutée :

auth      required      /usr/local/lib/security/pam_yubico.so mode=client authfile=/etc/yubikey id=1 key=VI5eTtCSAjdmp473G3rWFq+pL1k= url=http://192.168.0.100/wsapi/2.0/verify?id=%d&otp=%s

juste au dessus de la ligne :

auth      required      pam_unix.so     no_warn try_first_pass

authfile pointe vers votre fichier associant uid et clé OTP, id est la Client ID créée lors de l'ajout du client sur YK-VAL, key est la clé d'API associée à ce client. Pour finir, url est l'adresse du service de vérification sur YK-VAL. On peut tout à fait inscrire le nom du serveur YK-VAL dans l'URL à la place de son adresse IP, néanmoins en cas d'avarie du DNS il est souhaitable que l'authentification continue de fonctionner.

Dernière étape : la configuration du serveur sshd. Il s'agit assez simplement de modifier /etc/ssh/sshd_config pour s'assurer que les paramètres suivants sont actifs :

PasswordAuthentication no
ChallengeResponseAuthentication yes

Relancez ensuite sshd avec la commande service sshd restart et tentez la connexion à partir d'une machine sur laquelle votre Yubikey est connectée :

$ ssh patpro@192.168.0.104
YubiKey for `patpro': 
Password for patpro@test10.patpro.net:
Last login: Fri May  6 21:33:58 2016 from 192.168.0.2
FreeBSD 10.3-RELEASE (GENERIC) #0 r297264: Fri Mar 25 02:10:02 UTC 2016

Welcome to FreeBSD!
...

Enjoy.

Bibliographie

Pour réaliser cette infrastructure privative d'authentification double facteur et les articles qui en découlent, je me suis appuyé sur les sources suivantes :

yubikey-ksm, principes et installation.
yubikey-val, principes et installation.
Building a local Yubikey server infrastructure (sur Linux).
yubico-pam, README.
YubiKey on FreeBSD HOWTO, aspect "client" uniquement, utilisant en plus pam_per_user.

Related posts