Je ne vais pas rentrer dans le débat du pour ou contre l’écriture inclusive. Mon propos est ici d’étudier l’impact d’une forme de graphie utilisée dans le cadre de l’écriture inclusive française sur la sécurité des systèmes d’information.
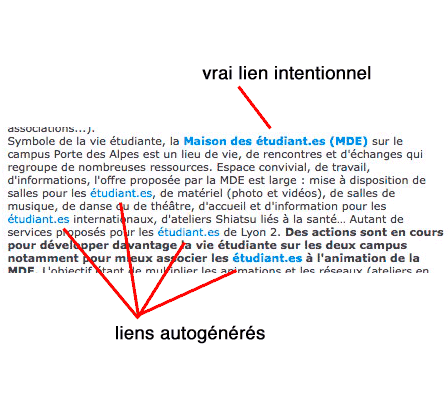
Il existe différentes formes ou manière de faire de l’écriture inclusive, utilisant différents artifices typographiques. Malheureusement, une des formes les plus élémentaires - celle qui utilise le point de ponctuation pour séparer les blocs - crée parfois des noms de domaines, comme par exemple : enseignant.es, doctorant.es, etc.
L’auteur d’un texte rédigé avec cette forme d’écriture inclusive peut donc se trouver rapidement à truffer sa prose de noms de domaine espagnols. Dans le cas d’un support totalement maîtrisé comme le papier ou l’image, l’impact est faible car le texte n’est pas immédiatement accessible à la machine. Il faudrait opérer une reconnaissance optique de caractère pour retrouver un texte électronique exploitable.
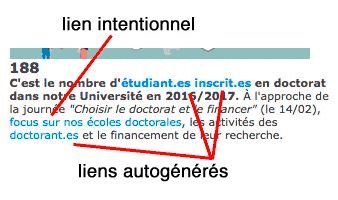 Malheureusement pour cette forme d’écriture, les supports numériques prévalent de plus en plus, et la maîtrise du support disparaît presque totalement au profit d’intermédiaires, de médias, qui peuvent décider d’améliorer l’expérience utilisateur sans demander son avis à l’auteur initial. Que cet intermédiaire soit un logiciel bureautique, un CMS, une plateforme de réseau social, une application de SMS, une messagerie instantanée, etc. nombreux sont ceux qui vont s’arroger le droit d’activer les URL qu’ils détectent dans les contenus soumis. Ainsi, quand un auteur écrit que « les étudiant.es peuvent se porter candidat.es au concours d’infirmier.es », il est bien possible que le média de publication informe les lecteurs que « les étudiant.es peuvent se porter candidat.es au concours d’infirmier.es ». La différence est de taille : les mots suffixés en
 .es sont devenus des URL actives.
Qui dit URL actives dit aussi : téléchargement d’un aperçu, possibilité de clic volontaire ou non sur une de ces URL, et dans des cas rares de vulnérabilité logicielle, possibilité de téléchargement de l’URL sans clic de la part du lecteur.
À titre de démonstration et d'expérience j'ai personnellement enregistré les noms étudiant.es et enseignant.es, puis je les ai faits pointer sur une page web que je maîtrise pour mesurer le comportement des utilisateurs en présence de ces noms de domaines. Sur une période de 31 jours, je mesure 5265 requêtes GET tous visiteurs confondus (avec une majorité de robots donc). Sur la même période, je mesure environ 350 visiteurs réels, soit plus de 10 par jour en moyenne, et avec un pic à 54 visiteurs un jour particulier.
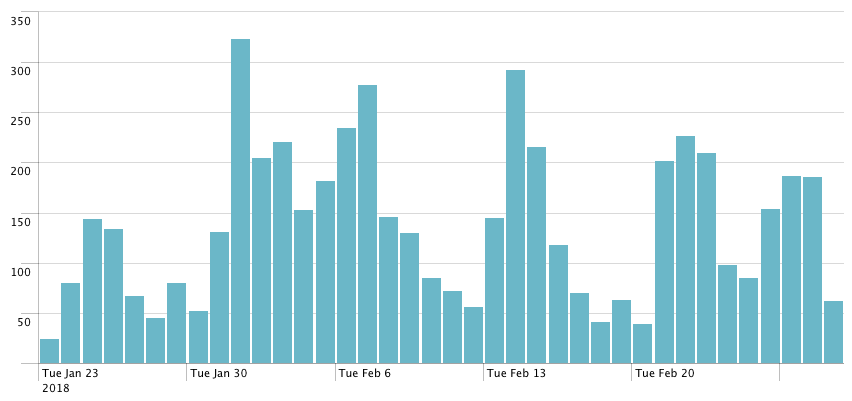
Nombre de "GET" par jour sur étudiant.es et enseignant.es
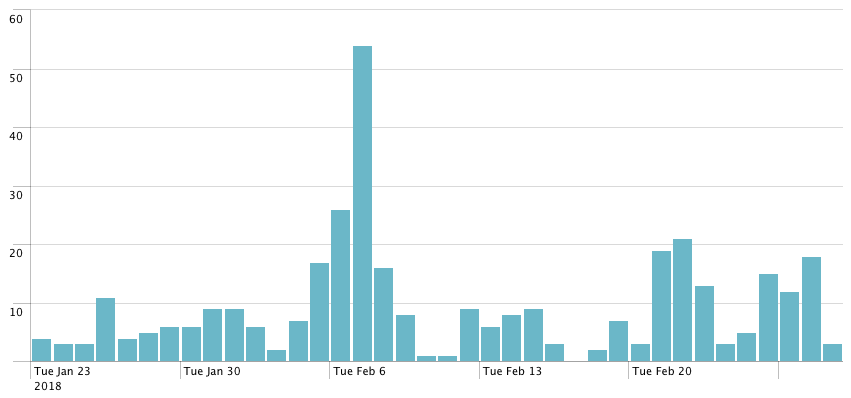
Estimation du nombre de "vrais visiteurs" par jour sur étudiant.es et enseignant.es
Les traces sur le serveur web montrent aussi qu'un grand nombre des requêtes de robots sont faites par des plateformes de réseau social, au moment où ces plateformes analysent le lien posté par l'utilisateur (création de l'aperçu, de l'URL raccourcie, détection de malware, analyse du contenu promu par l'utilisateur, etc.). Par exemple : Twitterbot, Facebookbot, EveryoneSocialBot, et autres.
L’URL ainsi activée va en général se retrouver sur des supports largement diffusés. On peut penser notamment à un CMS d’institution, mais aussi à des documents PDF, des emails, des messages diffusés sur des plateformes de réseau social comme Facebook, Twitter, Linked’In. Dans une grande université française, un seul auteur peut ainsi toucher directement 20000 à 60000 individus, et indirectement bien plus.
Il est donc normal dans un tel contexte d’envisager ce qu’il se passerait si par exemple quelqu’un décidait d’enregistrer tout ou partie de ces noms de domaines espagnols pour faire des choses avec :
- Faire du profit (affichage de publicité, vente de contrefaçon, pornographie, etc.)
- Attaquer les lecteurs de certains contenus en distribuant des malwares
- Lancer une campagne de phishing contre les lecteurs de ces contenus
- Porter atteinte à l’image de l’auteur (incitation à la haine, diffamation, etc.)
L’attaque en elle-même est extrêmement simple et économique. La location d’un nom de domaine à l’année coûte une poignée d’euros, et la plupart de ces mots français sont disponibles en .es. Par ailleurs, elle peut se produire à tout moment, et le plus tard est même le mieux : plus le nom de domaine est répandu, plus il est diffusé largement et dans un grand nombre de documents et supports, plus son exploitation devient intéressante.
Comme évoqué ci-dessus, les motivations de l’attaquant peuvent être diverses, néanmoins les effets de l’attaque sur l’auteur ou sur son entreprise/institution sont toujours les mêmes. Inévitablement il se produit un dégât d’image : personne ne trouverait normal en cliquant sur le mot canditat.es dans une communication officielle d’entreprise d’arriver sur un site pornographique (sauf bien évidemment si cette entreprise gère le site en question). Idem si le lecteur voit son antivirus passer au rouge suite à un clic sur infirmier.es.
Ensuite, il peut se produire une perte pour l’entreprise ou pour l’auteur : perte de temps et d’argent car il faut rapidement neutraliser les documents ou les URL dans les documents publiés. Cette opération curative est indispensable, mais impossible en pratique à faire en totalité : en effet il est impossible d’aller modifier les emails déjà envoyés, les documents PDF ou bureautique déjà téléchargés par le public, les SMS, etc.
Si l’attaquant a choisi une posture très offensive en faisant pointer les URL vers des malwares, alors l’auteur des contenus entre dans un nouveau cercle des Enfers : il pourra être amené à découvrir ce qu’il se produit lorsque Google décide de faire disparaître son site web des résultats de recherche, ce qu’il se produit quand tous les antispam de la planète décident de bloquer les emails qu’il envoie. Le blocage ne sera pas immédiat bien sûr, laissant à l’attaquant une fenêtre de tir pendant laquelle il pourra infecter d’innocents lecteurs. D’une pierre deux coups, en quelques sortes. Je n’ai pas de certitude sur le comportement des réseaux sociaux dans ce cas de figure, mais il est possible que certains décident de supprimer les messages contenant des liens vers des malwares, que d'autres suspendent le compte de l'auteur. Autant dire que tout à coup, les choses vont devenir très compliquées pour l’auteur.
À mon avis, il y a ici un risque qui vaut la peine d'être pris en compte. Même si on constate que le nombre de clics volontaires ou non sur ces liens automatiques est relativement faible, il reste très largement supérieur au "taux de conversion" habituel d'une campagne de phishing par email. Et nous protégeons tous nos utilisateurs contre le phishing, n'est-ce pas ?
Ici l'attaque part d'un support légitime, réellement écrit par son auteur : il ne s'agit pas d'un faux message de votre Support utilisateur écrit dans un français approximatif. Non, il s'agit de transformer des contenus légitimes en vecteur d'attaque sans même avoir besoin de modifier ces contenus.
À méditer.
 FIR is a web application designed by CERT Société Générale. It's coded in Python and uses Django.