Moving to Borgbackup

I used to have a quite complicated backup setup, involving macOS Time Machine, rsync, shell scripts, ZFS snapshots, pefs, local disks, a server on the LAN, and a server 450 km away. It was working great but I've felt like I could use a unified system that I could share across every systems and that would allow me to encrypt data at rest.
Pure ZFS was a no-go: snapshot send/receive is very nice but it lacks encryption for data at rest (transfer is protected by SSH encryption) and macOS doesn't support ZFS. Rsync is portable but does not offer encryption either. Storing data in a pefs vault is complicated and works only on FreeBSD.
After a while, I've decided that I want to be able to store my encrypted data on any LAN/WAN device I own and somewhere on the cloud of a service provider. I've read about BorgBackup, checked its documentation, found a Borg repository hosting provider with a nice offer, and decided to give it a try.

This is how I've started to use Borg with hosting provider BorgBase.

Borg is quite simple, even though it does look complicated when you begin. BorgBase helps a lot, because you are guided all along from ssh key management to creation of your first backup. They will also help automating backups with a almost-ready-to-use borgmatic config file.

Borg is secure: it encrypts data before sending them over the wire. Everything travels inside an SSH tunnel. So it's perfectly safe to use Borg in order to send your backups away in the cloud. The remote end of the SSH tunnel must have Borg installed too.

Borg is (quite) fast: it compresses and dedup data before sending. Only the first backup is a full one, every other backup will send and store only changed files or part of files.

Borg is cross-plateform enough: it works on any recent/supported macOS/BSD/Linux.

Borg is not for the faint heart: it's still command line, it's ssh keys to manage, it's really not the average joe backup tool. As rsync.net puts it: "You're here because you're an expert".

In the end, the only thing I'm going to regret about my former home-made backup system was that I could just browse/access/read/retrieve the content of any file in a backup with just ssh, which was very handy. With Borg this ease of use is gone, I'll have to restore a file if I want to access it.

I won't detail every nuts and bolts of Borg, lots of documentation exists for that. I would like to address a more organizational problem: doing backups is a must, but being able to leverage those backups is often overlooked.
I backup 3 machines with borg: A (workstation), B (home server), C (distant server). I've setup borgmatic jobs to backup A, B and C once a day to BorgBase cloud. Each job uses a dedicated SSH key and user account, a dedicated Repository key, a dedicated passphrase. I've also created similar jobs to backup A on B, A on C, B on C (but not Beyoncé).
Once you are confident that every important piece of data is properly backed up (borg/borgmatic job definition), you must make sure you are capable of retrieving it. It means even if a disaster occurs, you have in a safe place:

  • every repository URIs
  • every user accounts
  • every SSH keys
  • every repository keys
  • every passphrases

Any good password manager can store this. It's even better if it's hosted (1password, dashlane, lastpass, etc.) so that it doesn't disappear in the same disaster that swallowed your data. Printing can be an option, but I would not recommend it for keys, unless you can encode them as QRCodes for fast conversion to digital format.

You must check from time to time that your backups are OK, for example by restoring a random file in /tmp and compare to current file on disk. You must also attempt a restoration on a different system, to make sure you can properly access the repository and retrieve files on a fresh/blank system. You can for example create a bootable USB drive with BSD/Linux and borg installed to have a handy recovery setup ready to use in case of emergency.

Consider your threat model, YMMV, happy Borg-ing.
Related posts

ZFS primary cache is good

Last year I've written a post about ZFS primarycache setting, showing how it's not a good idea to mess with it. Here is a new example based on real world application.
Recently, my server crashed, and at launch-time Splunk decided it was a good idea to re-index a huge apache log file. Apart from exploding my daily index quota, this misbehavior filed the index with duplicated data. Getting rid of 1284408 events in Splunk can be a little bit resource-intensive. I won't detail the Splunk part of the operation: I've ended up having 1285 batches of delete commands that I've launched with a simple for/do/done bash loop. After a while, I noticed that the process was slow and was making lots of disk IOs. Annoying. So I checked:

# zfs get primarycache zdata/splunk
NAME          PROPERTY      VALUE         SOURCE
zdata/splunk  primarycache  metadata      local

Uncool. This setting was set locally so that my toy (Splunk) would not harvest all ARC from the server, hurting production. For efficiency's sake, I've switched back the primary cache to all:

# zfs set primarycache=all zdata/splunk

Effect was almost instantaneous: ARC filled with Splunk data and disk IOs plummeted.

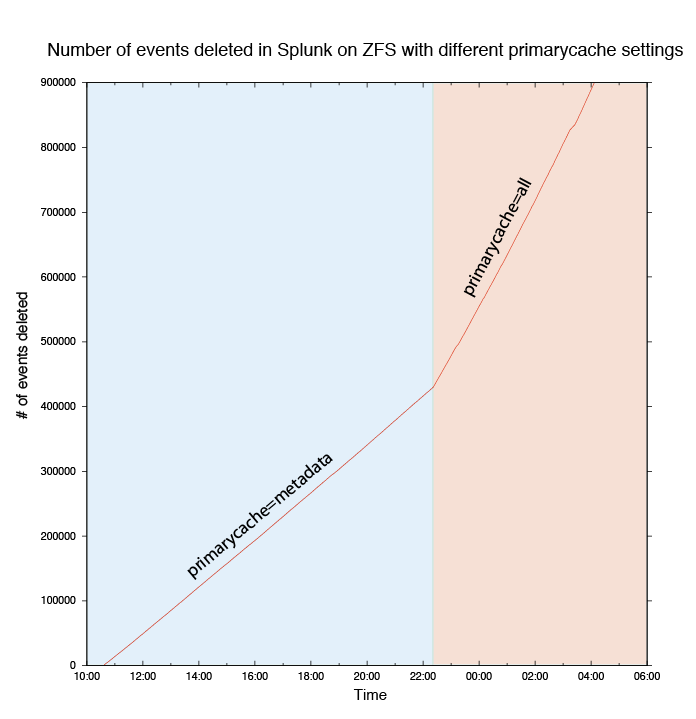
primarycache # of deletes per second
metadata 10.06
all 22.08

A x2.2 speedup on a very long operation (~20 hours here) is a very good argument in favor of primarycache=all for any ZFS user.

acceleration of a repetitive splunk operation thanks to ZFS primarycache setting

Acceleration of a repetitive splunk operation thanks to ZFS primarycache setting

Related posts

ZFS primarycache: all versus metadata

In my previous post, I wrote about tuning a ZFS storage for MySQL. For InnoDB storage engine, I've tuned the primarycache property so that only metadata would get cached by ZFS. It makes sense for this particular use, but in most cases you'll want to keep the default primarycache setting (all).
Here is a real world example showing how a non-MySQL workload is affected by this setting.

On a virtual server, 2 vCPU, 8 GB RAM, running FreeBSD 9.1-RELEASE-p7, I have a huge zpool of about 4 TB. It uses gzip compression, and stores 1.8TB of emails (compressratio 1.61x) and 1TB documents (compressratio 1.15x). Documents and emails have their own dataset, on the same zpool.
As it's a secondary backup server, isolated from production, I can easily make some tests.

I've launched clamscan (the binary part of ClamAV virus scanner) against a small branch of the email storage tree (about 1/1000 of total emails) and measured the zpool IOs, CPU usage and total runtime of the scan.
Before each run, I've rebooted the server to clear cache.
clamscan is set up so that every temporary files are written into a UFS2 filesystem (/tmp).

One run was made with property primarycache set to all, the other run was made with primarycache set to metadata.

Total runtime with default settings primarycache=all is less than 15 minutes, for 20518 files:

Scanned directories: 1
Scanned files: 20518
Infected files: 2
Data scanned: 7229.92 MB
Data read: 2664.59 MB (ratio 2.71:1)
Time: 892.431 sec (14 m 52 s)

Total runtime with default settings primarycache=metadata is more than 33 minutes:

Scanned directories: 1
Scanned files: 20518
Infected files: 2
Data scanned: 7229.92 MB
Data read: 2664.59 MB (ratio 2.71:1)
Time: 2029.921 sec (33 m 49 s)

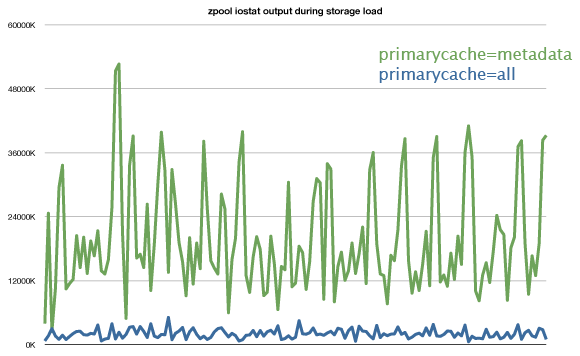
zpool iostat every 5 seconds, with different primarycache settings, ~10 minutes range.

zpool IO stats

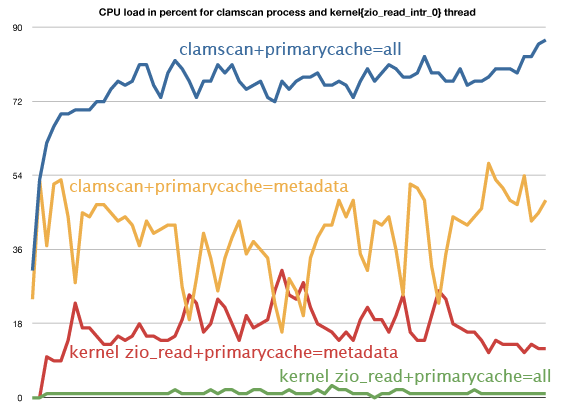
CPU usage for clamscan process, and for kernel{zio_read_intr_0} kernel thread. 5 seconds sampling, with different primarycache settings, ~10 minutes range.

CPU stats

In both tests, the server is freshly rebooted, cache is empty. Nevertheless, when primarycache=all the kernel{zio_read_intr_0} thread consumes very few CPU cycles, and the clamscan process run's more than twice as fast as the same process with primarycache=metadata.
More importantly, clamscan manages to read the exact same amount of data in both tests, using 10 times less IO throughput when primarycache is set to all.

There is something weird. Let's make another test:

I create 2 brand new datasets, both with primarycache=none and compression=lz4, and I copy in each one a 4.8GB file (2.05x compressratio). Then I set primarycache=all on the first one, and primarycache=metadata on the second one.
I cat the first file into /dev/null with zpool iostat running in another terminal. And finally, I cat the second file the same way.

The sum of read bandwidth column is (almost) exactly the physical size of the file on the disk (du output) for the dataset with primarycache=all: 2.44GB.
For the other dataset, with primarycache=metadata, the sum of the read bandwidth column is ...wait for it... 77.95GB.

There is some sort of voodoo under the hood that I can't explain. Feel free to comment if you have any idea on the subject.

A FreeBSD user has posted an interesting explanation to this puzzling behavior in FreeBSD forums:

clamscan reads a file, gets 4k (pagesize?) of data and processes it, then it reads the next 4k, etc.

ZFS, however, cannot read just 4k. It reads 128k (recordsize) by default. Since there is no cache (you've turned it off) the rest of the data is thrown away.

128k / 4k = 32
32 x 2.44GB = 78.08GB

Damnit.

Related posts

MySQL on ZFS (on FreeBSD)

logofreebsdLots of FreeBSD users are coming to ZFS since the release of FreeBSD 10, as it's so easy to install the system on top of that powerful filesystem. ZFS default behavior and settings are perfect for a wide range of workloads and uses, but it's not exactly what you need for databases hosting.
I'm running a FreeBSD 9.x server hosting http, php, mysql, mail, and many other things, so a databases-only optimization would be counterproductive. After a good dive into experts do's & don't's here are few steps I've taken to tune my server.

Datasets

If like me you've started hosting MySQL databases a long time ago (say ~15 years ago) you might have some DB using the old MyISAM engine, and some newer ones using InnoDB. Guess what. They use different block sizes, and they use different caching mechanisms.
On top of that, the block size for InnoDB is not the same when you deal with data files, and when you deal with log files.
In order to get the best block size and cache tuning possible, I've created 3 datasets: one for InnoDB data files, one for innodb logs, and one for everything else, including MyISAM databases.

Block size

The block size is engine dependent. MyISAM uses a 8k block size, InnoDB uses a 16k block size for data and 128k for logs. It's easy to setup datasets for a particular block size at creation with -o option, or after creation with zfs set. You must set the proper block size before putting any data on the dataset, otherwise pre-existing data won't use the desired block size.

Caching

MyISAM engine relies on the underlying filesystem caching mechanism, so you must ensure ZFS will cache both data and metadata (that's the default behavior). On the other hand, InnoDB uses an internal cache, so it would be a waste on memory to cache the same data into ZFS and InnoDB. On a dedicated MySQL server, the proper tuning would require to limit ARC size, and to disable data caching in ZFS. On a general-purpose server, ARC size should not be tweaked, but on InnoDB dedicated datasets it's easy to disable ZFS cache for data by setting the property primarycache to "metadata".

On MySQL's side

You must of course tell mysqld where to find data files and logs. I've set those values in my /var/db/mysql/my.cnf file:

innodb_data_home_dir = /var/db/mysql-innodb
innodb_log_group_home_dir = /var/db/mysql-innodb-logs

where /var/db/mysql-innodb and /var/db/mysql-innodb-logs are mount points for the dataset dedicated to InnoDB data files, and the dataset dedicated to InnoDB log files.

As my zpool is a mirror, I've added this setting too:

skip-innodb_doublewrite

Step by step

I've followed this course of action:

1st step: mailing to users, "MySQL will be unavailable for about 5 minutes, hang on."
2nd step: backup /var/db/mysql and edit your my.cnf
3rd step: shutdown your mysql server

sudo service mysql-server stop

4th step: move /var/db/mysql to /var/db/mysql-origin
5th step: create appropriate datasets:

zfs create -o recordsize=16k -o primarycache=metadata zmirror/var/db/mysql-innodb
zfs create -o recordsize=128k -o primarycache=metadata zmirror/var/db/mysql-innodb-logs
zfs create -o recordsize=8k zmirror/var/db/mysql

6th step: move data from /var/db/mysql-origin to your new datasets

cd /var/db/
sudo mv mysql-origin/ib_logfile* mysql-innodb-logs/
sudo mv mysql-origin/ibdata1 mysql-innodb/
sudo mv mysql-origin/* mysql/

and set proper rights:

sudo chown mysql:mysql mysql-innodb-logs mysql-innodb mysql
sudo chmod o= mysql mysql-innodb-logs mysql-innodb

7th step: restart your mysql server

sudo service mysql-server start & tail -f mysql/${HOSTNAME}.err

8th step: mailing to users, "MySQL's back online maintenance duration 5 min 14 sec."

Further reading & references

MySQL Innodb ZFS Best Practices
A look at MySQL on ZFS
Optimizing MySQL performance with ZFS
ZFS for Databases

Related posts

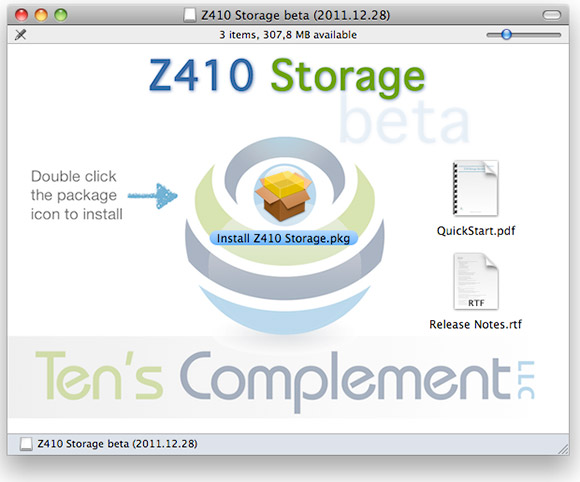
Welcome to our Z410 Storage Beta program

rahhh lovely

C'est Noël ! Dommage que mes congés soient terminés...

Related posts