Multi-head virtualized workstation: the end.

Four years ago I've started a journey in workstation virtualization. My goal at the time was to try and escape Apple's ecosystem as it was moving steadily toward closedness (and iOS-ness). I also though back then that it would allow me to pause planned obsolescence by isolating the hardware from the software.
I've been very wrong.
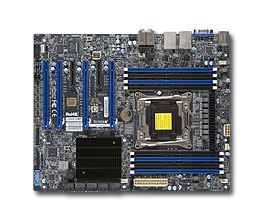
My ESXi workstation was built with power, scalability and silence in mind. And it had all this for a long time. But about 1.5 year ago I've started to notice the hum of one of its graphics card. Recently this hum turned into an unpleasant high pitched sound under load. The fans were aging and I needed a solution. Problem is, one just can't choose any graphics card off the shelf and put it into an ESXi server. It requires a compatibility study: card vs motherboard, vs PSU, vs ESXi, vs VM Operating system. If you happened to need an ESXi upgrade (from 5.x to 6.x for example) in order to use a new graphics card then you need to study the compatibility of this new ESXi with your other graphics cards, your other VM OSes, etc.
And this is where I was stuck. My main workstation was a macOS VM using an old Mac Pro Radeon that would not work on ESXi 6.x. All things considered, every single upgrade path was doomed to failure unless I could find a current graphics card, silent, that would work on ESXi 5.x and get accepted by the Windows 10 guest via PCI passthrough. I've found one: the Sapphire Radeon RX 590 Nitro+. Worked great at first. Very nice benchmark and remarquable silence. But after less than an hour I noticed that HDDs inside the ESXi were missing, gone. In fact, under GPU load the motherboard would lose its HDDs. I don't know for sure but it could have been a power problem, even though the high quality PSU was rated for 1000W. Anyway, guess what: ESXi does not like losing its boot HDD or a datastore. So I've sent the graphics card back and got a refund.
Second problem: I was stuck with a decent but old macOS release (10.11, aka El Capitan). No more updates, no more security patches. Upgrading the OS was also a complex operation with compatibility problems with the old ESXi release and with the older Mac Pro Radeon. I've tried a few things but it always ended with a no-go.
Later this year, I've given a try to another Radeon GPU, less power-hungry but it yielded to other passthrough and VM malfunctions. This time I choose to keep the new GPU as an incentive to deal with the whole ESXi mess.

So basically, the situation was: very nice multi-head setup, powerful, scalable (room for more storage, more RAM, more PCI) but stuck in the past with a 5 years old macOS using a 10 years old Mac Pro graphics card in passthrough on top of a 5 years old ESXi release, the Windows 10 GPU becoming noisy, and nowhere to go from there.

I went through the 5 stages of grief and accepted that this path was a dead-end. No more workstation virtualization, no more complex PCI passthrough, I've had enough. Few weeks ago I've started to plan my escape: I need a silent Mac with decent power and storage (photo editing), I need a silent and relatively powerful Windows 10 gaming PC, I need an always on, tiny virtualization box for everything else (splunk server, linux and FreeBSD experiments, etc.). It was supposed to be a slow migration process, maintaining both infrastructures in parallel for some weeks and allowing perfect testing and switching.
Full disclosure: it was not.

I've created the Mac first, mostly because the PC case ordered was not delivered yet. Using a NUC10i7 I've followed online instructions and installed my very first Hackintosh. It worked almost immediately. Quite happy about the result, I've launched the migration assistant on my macOS VM and on my Hackintosh and injected about 430 Go of digital life into the little black box. Good enough for a test, I was quite sure I would wipe everything and rebuild a clean system later.

Few days later I started to build the PC. I was supposed to reclaim a not-so-useful SSD from the ESXi workstation to use as the main bare metal PC storage. I've made sure nothing was on the SSD, I've shutdown ESXi and removed the SSD and it's SATA cable. I've also removed another SSD+cable that was not used (failed migration attempt to ESXi 6.x and test for Proxmox). I've restarted ESXi just to find out a third SSD has disappeared: a very useful datastore is missing, 7 or 8 VM are impacted, partially or totally. The macOS VM is dead, main VMDK is missing (everything else is present, even its Time Machine VMDK), the Splunk VM is gone with +60 Go of logs, Ubuntu server is gone, some FreeBSD are gone too, etc.
Few reboots later, I extract the faulty SSD and start testing: different cable, different port, different PC. Nothing works and the SSD is not even detected by the BIOS (on both PCs).
This is a good incentive for a fast migration to bare metal PCs.
Fortunately:
- a spare macOS 10.11 VM, blank but fully functional, is waiting for me on an NFS datastore (backed by FreeBSD and ZFS).
- the Time machine VMDK of my macOS VM workstation is OK
- my Hackintosh is ready even though its data is about a week old
- the Windows 10 VM workstation is fully functional

So I've plugged the Time machine disk into the spare macOS VM, booted it, and launched Disk Utility to create a compressed image of the Time machine disk. Then I've copied this 350 Go dmg file on the Hackintosh SSD, after what I've mounted this image and copied the week worth of out-of-sync data to my new macOS bare metal workstation (mostly Lightroom related files and pictures).
I've plugged the reclaimed SSD into the new PC and installed Windows 10, configured everything I need, started Steam and downloaded my usual games.
Last but not least, I've shutdown the ESXi workstation, for good this time, unplugged everything (a real mess), cleaned up a bit, installed the new, way smaller, gaming PC, plugged everything.

Unfortunately, the Hackintosh uses macOS Catalina. This version won't run many of paid and free software I'm using. Say good bye to my Adobe CS 5 suite, bought years ago, good bye to BBEdit (I'll buy the latest release ASAP), etc. My Dock is a graveyard of incompatible applications. Only sparkle of luck here: LightRoom 3 that seems to be pretty happy on macOS 10.15.6.

In less than one day and a half I've moved from a broken multi-head virtualized workstation to bare metal PCs running up-to-date OSes on top of up-to-date hardware. Still MIA, the virtualization hardware to re-create my lab.

What saved me:
- backups
- preparedness and contingency plan
- backups again

Things to do:
- put the Hackintosh into a fanless case
- add an SSD for Time machine
- add second drive in Windows 10 PC for backups
- buy another NUC for virtualization lab
- buy missing software or find alternatives

Related posts

Moving to Borgbackup

I used to have a quite complicated backup setup, involving macOS Time Machine, rsync, shell scripts, ZFS snapshots, pefs, local disks, a server on the LAN, and a server 450 km away. It was working great but I've felt like I could use a unified system that I could share across every systems and that would allow me to encrypt data at rest.
Pure ZFS was a no-go: snapshot send/receive is very nice but it lacks encryption for data at rest (transfer is protected by SSH encryption) and macOS doesn't support ZFS. Rsync is portable but does not offer encryption either. Storing data in a pefs vault is complicated and works only on FreeBSD.
After a while, I've decided that I want to be able to store my encrypted data on any LAN/WAN device I own and somewhere on the cloud of a service provider. I've read about BorgBackup, checked its documentation, found a Borg repository hosting provider with a nice offer, and decided to give it a try.

This is how I've started to use Borg with hosting provider BorgBase.

Borg is quite simple, even though it does look complicated when you begin. BorgBase helps a lot, because you are guided all along from ssh key management to creation of your first backup. They will also help automating backups with a almost-ready-to-use borgmatic config file.

Borg is secure: it encrypts data before sending them over the wire. Everything travels inside an SSH tunnel. So it's perfectly safe to use Borg in order to send your backups away in the cloud. The remote end of the SSH tunnel must have Borg installed too.

Borg is (quite) fast: it compresses and dedup data before sending. Only the first backup is a full one, every other backup will send and store only changed files or part of files.

Borg is cross-plateform enough: it works on any recent/supported macOS/BSD/Linux.

Borg is not for the faint heart: it's still command line, it's ssh keys to manage, it's really not the average joe backup tool. As rsync.net puts it: "You're here because you're an expert".

In the end, the only thing I'm going to regret about my former home-made backup system was that I could just browse/access/read/retrieve the content of any file in a backup with just ssh, which was very handy. With Borg this ease of use is gone, I'll have to restore a file if I want to access it.

I won't detail every nuts and bolts of Borg, lots of documentation exists for that. I would like to address a more organizational problem: doing backups is a must, but being able to leverage those backups is often overlooked.
I backup 3 machines with borg: A (workstation), B (home server), C (distant server). I've setup borgmatic jobs to backup A, B and C once a day to BorgBase cloud. Each job uses a dedicated SSH key and user account, a dedicated Repository key, a dedicated passphrase. I've also created similar jobs to backup A on B, A on C, B on C (but not Beyoncé).
Once you are confident that every important piece of data is properly backed up (borg/borgmatic job definition), you must make sure you are capable of retrieving it. It means even if a disaster occurs, you have in a safe place:

  • every repository URIs
  • every user accounts
  • every SSH keys
  • every repository keys
  • every passphrases

Any good password manager can store this. It's even better if it's hosted (1password, dashlane, lastpass, etc.) so that it doesn't disappear in the same disaster that swallowed your data. Printing can be an option, but I would not recommend it for keys, unless you can encode them as QRCodes for fast conversion to digital format.

You must check from time to time that your backups are OK, for example by restoring a random file in /tmp and compare to current file on disk. You must also attempt a restoration on a different system, to make sure you can properly access the repository and retrieve files on a fresh/blank system. You can for example create a bootable USB drive with BSD/Linux and borg installed to have a handy recovery setup ready to use in case of emergency.

Consider your threat model, YMMV, happy Borg-ing.

Related posts

Escaping the Apple ecosystem: a view of the setup

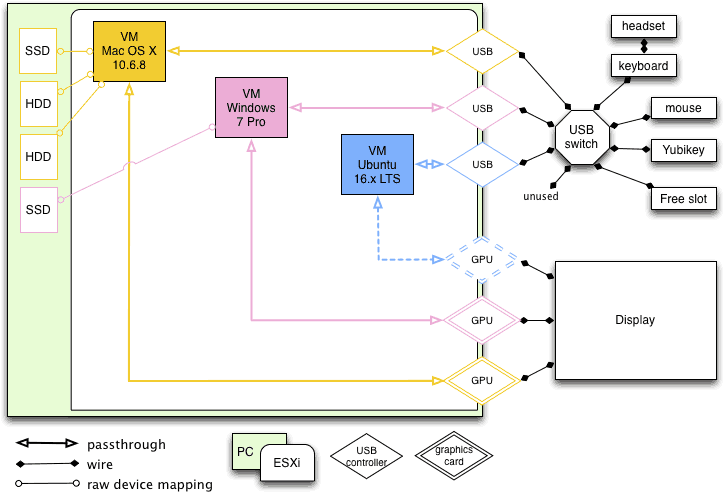
Here is a quick & dirty view of the physical and logical setup of my new workstation. The linux part is not finished yet (no drivers for Radeon GPU, thank you Ubuntu), it's a work in progress.

esx
Not depicted: each USB controller sports 4 USB ports (yellow) or 2 USB ports (pink and blue). It allows me to plug few devices that won't be "managed" by the USB switch.
USB devices plugged-in on the switch are made available to only one VM at a time. When I press the switch button, they disappear for the current VM and are presented to the next one.

Related posts

Escaping the Apple ecosystem: part 3

In part 2, I was able to create and use a Windows 7 VM with the Radeon R9 270x in passthrough. It works really great. But OSX and Linux where more difficult to play with.

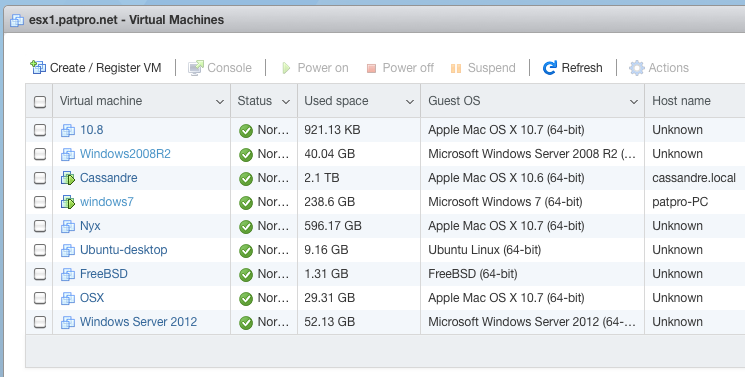
List of virtual machines

List of virtual machines


Since then, I've made tremendous progress: I've managed to run an OSX 10.11.6 VM properly, but more importantly, I've managed to run my native Mac OS X 10.6.8 system as a VM, with the Mac's Radeon in passthrough.
I've removed my Mac OS X SSD and the Mac's graphics card from the Mac Pro tower, and installed them into the PC tower. Then I've created the VM for the 10.6.8 system, configured ESXi to use Mac's Radeon with VT-d, etc.
The only real problem here is that adding a PCI card into the PC tower makes PCI device numbers change: it breaks almost every passthrough already configured. I had to remake VT-d config for the Windows VM. Apart from that, it went smoothly.
Currently, I'm working on my native 10.6.8 system, that runs as a VM, and the Windows VM is playing my music (because the Realtek HD audio controller is dedicated to the Windows VM).
Moving from a Mac Pro with 4-core 2.8 GHz Xeon to a 6-core 3.5 GHz Core i7 really gives a boost to my old 10.6.8 system.

Running both OSes, the box is almost as silent as the Mac Pro while packing almost twice as more raw CPU power and 2.7x more GPU power.

The Mac Pro is now empty: no disks, no graphics card, and will probably go on sale soon.

to-do list:

  • secure the whole infrastructure ;
  • install 2nd-hand MSI R9 270x when it's delivered ;
  • properly setup Linux to use AMD graphics card.

I might also add few SSDs and a DVD burner before year's end.

Related posts

Firefox mange mon CPU

Comme je suis vieux et extrémiste, j'ai décidé de ne pas adhérer aux mises à jour continuelles des systèmes d'exploitation Apple. Ce que proposent les nouvelles versions est rarement intéressant (cloud, flicage des utilisateurs, baisse des performances, App Store, etc.).
Le souci avec les vieux logiciels, c'est le manque de sécurité qu'ils offrent. Les nouveaux ne valent guère mieux, mais la mesure du risque se fait sur le nombre de failles connues, et donc à ce compte là, les anciennes versions sont toujours perdantes. Ne faisant plus évoluer mon système, mais passant mon temps sur internet, j'ai donc du m'adapter : virer mon Safari préhistorique, et installer un navigateur bien à jour, au taquet, fourni par un éditeur qui lui ne se fout pas de ma gueule (comprendre qu'il n'oblige pas les gens à acheter un nouveau Mac pour bénéficier d'un navigateur web à jour).

Bref, j'utilise Firefox.

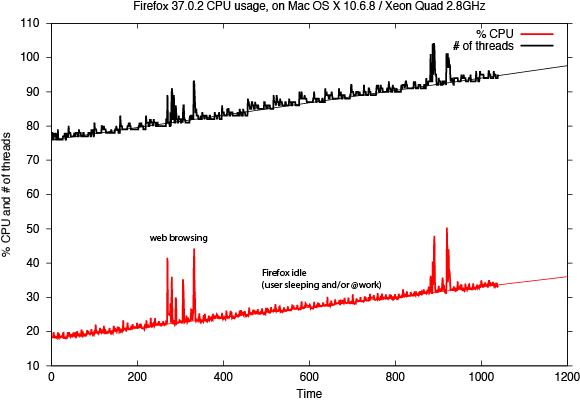
J'en étais content, jusqu'au moment où j'ai trouvé qu'il était relativement lent, puis lent, puis très lent, puis très très lent. En fait, ce navigateur mange mon CPU. Petit à petit. Si vous êtes le genre d'utilisateur qui allume/éteint sa machine tous les jours, vous n'avez pas ce problème. Mais si vous laissez le chauffage d'appoint allumé 24/7/365, alors vous pourriez constater ce genre de chose :

firefox_cpu-580

Avec le temps qui passe Firefox consomme de plus en plus de cycles de processeur. Après une poignée d'heures, il est environ à 18%. Sans rien faire avec, 200 minutes plus tard il consomme 21% du CPU. Après 1000 minutes, il oscille entre 33 et 35% CPU.
On constate aussi que le nombre de threads de l'application gonfle tranquillement.

J'ai tenté d'accuser les extensions, mais je n'en utilise que 2 et une fois désactivées Firefox avait le même comportement. J'ai aussi tenté d'analyser le comportement du navigateur avec Instruments, sans succès. Je ne comprends pas d'où vient le souci. Peut être d'une des pages web que je garde ouvertes en permanence… Quoi qu'il en soit, c'est un peu dommage, je vais devoir programmer un redémarrage de Firefox toutes les nuits

Related posts

L4D2: comparative benchmark between Mac OS X and Windows

Back in december 2012 I've benchmarked (shortly) native and virtualized Mac OS X against virtualized Windows.
Few days ago, I've dedicated a 250G B SSD to a Windows 7 installation, inside my Mac Pro. Weird thing for me to go back and forth between Mac OS X and Windows. I'm more accustomed to +50 days long uptime. Admittedly my various attempts to put Mac OS X into deep sleep, reboot on Windows, and go back later to a fully restored Mac OS X session right out from deep sleep, are failing. That's another story.
Nevertheless, I'm using this Windows system as a playground.

Inside this Mac Pro model 2010, I've one Xeon quad core 2.8 GHz with 24 GB RAM, and a Radeon HD 5770. One SSD is dedicated to Mac OS X 10.6.8, and one SSD is dedicated to Windows 7 Pro 64 bits (with latest stable Catalyst drivers). Both systems are using the latest Steam client with a fully updated and clean Left 4 Dead 2 install.

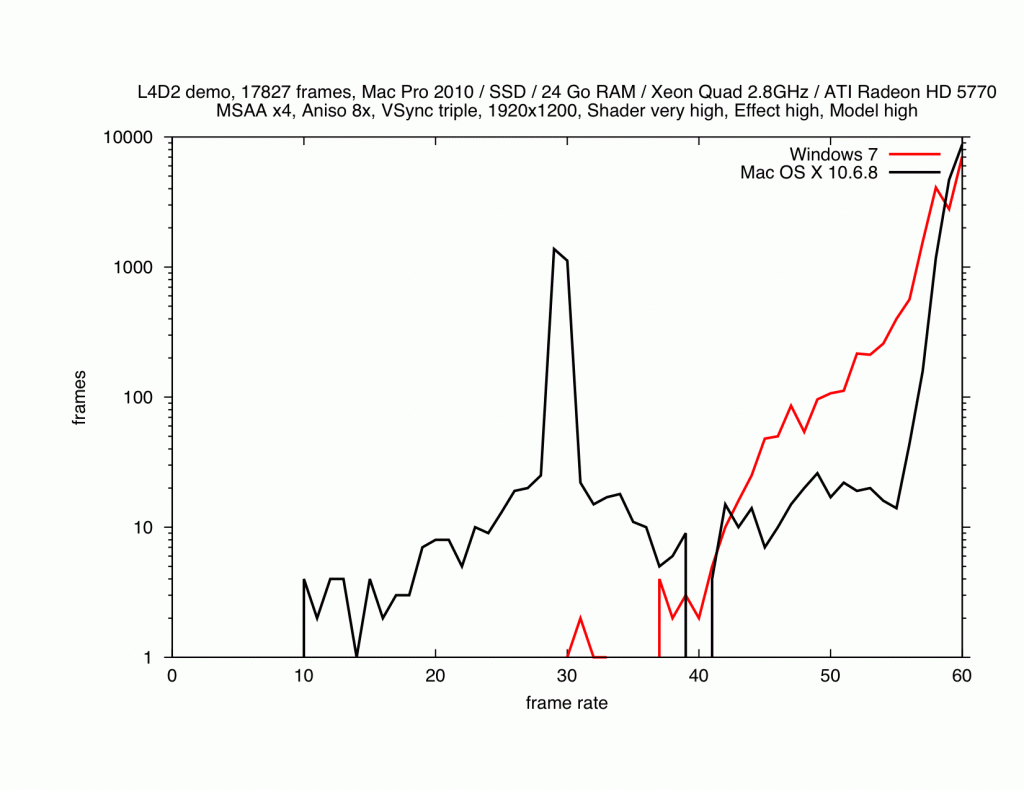
I've recorded a demo, and played back this file on both systems with identical video settings, recording fps numbers during the playback. The demo is 17827 frames long, and video settings are "MSAA x4", "Anisotropic 8x", "vertical sync triple", "resolution 1920x1200", "shader detail very high', "effect detail high", "model/texture detail high".

The playback is a bit laggy on Mac OS X, especially when the player is looking at fire. It would be playable, but not a very smooth experience. The playback is better on Windows.
Here is the plot of numbers of frames calculated at a given fps rate. For example, on Mac OS X (black line) a total of 4 frames were calculated at a frame rate of 10 fps. On Windows, 90 frames where calculated at a frame rate of 47 fps.

click plot to display full size

click plot to display full size

Windows 7 has better drivers, and may be the game itself is coded better. The fact is some situations in the game are not handled very well by the GPU on Mac OS X. The huge spike around 30 fps means that ~2500 frames were computed at about 30 fps. Not good. But more importantly the global shape of the plot shows a spread of fps values from as low as 10 fps to 60 fps. Note that the log scale on Y does mask isolated frames (Y=1).
Windows does a better job here, with only a handful of frames below 40 fps.

Fortunately L4D2 is an old game, and my hardware is enough to handle it nicely even on Mac OS X (I usually play at 1600x1000), but being able to push it a little further with full quality on Windows is a nice thing. I hope L4D3 will run ok too, some day, in a not too distant future.

Edit

To complete the comparison, I've made a Cinebench R15 benchmark. The OpenGL score on Windows 7 is ~64 fps, and the same test on Mac OS X 10.6.8 is ~53 fps. On CPU side both OSes score around 440.

Related posts