Multi-head virtualized workstation: the end.

Four years ago I've started a journey in workstation virtualization. My goal at the time was to try and escape Apple's ecosystem as it was moving steadily toward closedness (and iOS-ness). I also though back then that it would allow me to pause planned obsolescence by isolating the hardware from the software.
I've been very wrong.
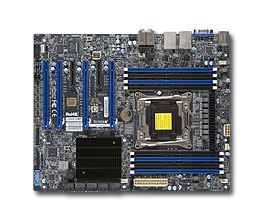
My ESXi workstation was built with power, scalability and silence in mind. And it had all this for a long time. But about 1.5 year ago I've started to notice the hum of one of its graphics card. Recently this hum turned into an unpleasant high pitched sound under load. The fans were aging and I needed a solution. Problem is, one just can't choose any graphics card off the shelf and put it into an ESXi server. It requires a compatibility study: card vs motherboard, vs PSU, vs ESXi, vs VM Operating system. If you happened to need an ESXi upgrade (from 5.x to 6.x for example) in order to use a new graphics card then you need to study the compatibility of this new ESXi with your other graphics cards, your other VM OSes, etc.
And this is where I was stuck. My main workstation was a macOS VM using an old Mac Pro Radeon that would not work on ESXi 6.x. All things considered, every single upgrade path was doomed to failure unless I could find a current graphics card, silent, that would work on ESXi 5.x and get accepted by the Windows 10 guest via PCI passthrough. I've found one: the Sapphire Radeon RX 590 Nitro+. Worked great at first. Very nice benchmark and remarquable silence. But after less than an hour I noticed that HDDs inside the ESXi were missing, gone. In fact, under GPU load the motherboard would lose its HDDs. I don't know for sure but it could have been a power problem, even though the high quality PSU was rated for 1000W. Anyway, guess what: ESXi does not like losing its boot HDD or a datastore. So I've sent the graphics card back and got a refund.
Second problem: I was stuck with a decent but old macOS release (10.11, aka El Capitan). No more updates, no more security patches. Upgrading the OS was also a complex operation with compatibility problems with the old ESXi release and with the older Mac Pro Radeon. I've tried a few things but it always ended with a no-go.
Later this year, I've given a try to another Radeon GPU, less power-hungry but it yielded to other passthrough and VM malfunctions. This time I choose to keep the new GPU as an incentive to deal with the whole ESXi mess.

So basically, the situation was: very nice multi-head setup, powerful, scalable (room for more storage, more RAM, more PCI) but stuck in the past with a 5 years old macOS using a 10 years old Mac Pro graphics card in passthrough on top of a 5 years old ESXi release, the Windows 10 GPU becoming noisy, and nowhere to go from there.

I went through the 5 stages of grief and accepted that this path was a dead-end. No more workstation virtualization, no more complex PCI passthrough, I've had enough. Few weeks ago I've started to plan my escape: I need a silent Mac with decent power and storage (photo editing), I need a silent and relatively powerful Windows 10 gaming PC, I need an always on, tiny virtualization box for everything else (splunk server, linux and FreeBSD experiments, etc.). It was supposed to be a slow migration process, maintaining both infrastructures in parallel for some weeks and allowing perfect testing and switching.
Full disclosure: it was not.

I've created the Mac first, mostly because the PC case ordered was not delivered yet. Using a NUC10i7 I've followed online instructions and installed my very first Hackintosh. It worked almost immediately. Quite happy about the result, I've launched the migration assistant on my macOS VM and on my Hackintosh and injected about 430 Go of digital life into the little black box. Good enough for a test, I was quite sure I would wipe everything and rebuild a clean system later.

Few days later I started to build the PC. I was supposed to reclaim a not-so-useful SSD from the ESXi workstation to use as the main bare metal PC storage. I've made sure nothing was on the SSD, I've shutdown ESXi and removed the SSD and it's SATA cable. I've also removed another SSD+cable that was not used (failed migration attempt to ESXi 6.x and test for Proxmox). I've restarted ESXi just to find out a third SSD has disappeared: a very useful datastore is missing, 7 or 8 VM are impacted, partially or totally. The macOS VM is dead, main VMDK is missing (everything else is present, even its Time Machine VMDK), the Splunk VM is gone with +60 Go of logs, Ubuntu server is gone, some FreeBSD are gone too, etc.
Few reboots later, I extract the faulty SSD and start testing: different cable, different port, different PC. Nothing works and the SSD is not even detected by the BIOS (on both PCs).
This is a good incentive for a fast migration to bare metal PCs.
Fortunately:
- a spare macOS 10.11 VM, blank but fully functional, is waiting for me on an NFS datastore (backed by FreeBSD and ZFS).
- the Time machine VMDK of my macOS VM workstation is OK
- my Hackintosh is ready even though its data is about a week old
- the Windows 10 VM workstation is fully functional

So I've plugged the Time machine disk into the spare macOS VM, booted it, and launched Disk Utility to create a compressed image of the Time machine disk. Then I've copied this 350 Go dmg file on the Hackintosh SSD, after what I've mounted this image and copied the week worth of out-of-sync data to my new macOS bare metal workstation (mostly Lightroom related files and pictures).
I've plugged the reclaimed SSD into the new PC and installed Windows 10, configured everything I need, started Steam and downloaded my usual games.
Last but not least, I've shutdown the ESXi workstation, for good this time, unplugged everything (a real mess), cleaned up a bit, installed the new, way smaller, gaming PC, plugged everything.

Unfortunately, the Hackintosh uses macOS Catalina. This version won't run many of paid and free software I'm using. Say good bye to my Adobe CS 5 suite, bought years ago, good bye to BBEdit (I'll buy the latest release ASAP), etc. My Dock is a graveyard of incompatible applications. Only sparkle of luck here: LightRoom 3 that seems to be pretty happy on macOS 10.15.6.

In less than one day and a half I've moved from a broken multi-head virtualized workstation to bare metal PCs running up-to-date OSes on top of up-to-date hardware. Still MIA, the virtualization hardware to re-create my lab.

What saved me:
- backups
- preparedness and contingency plan
- backups again

Things to do:
- put the Hackintosh into a fanless case
- add an SSD for Time machine
- add second drive in Windows 10 PC for backups
- buy another NUC for virtualization lab
- buy missing software or find alternatives
Related posts

3 semaines avec le Vortex ViBE

Après avoir utilisé mon nouveau clavier mécanique Vortex ViBE pendant un peu plus de 3 semaines il est temps de faire un petit retour sur l'engin. J'utilise depuis plus de 20 ans des claviers Apple français dont la disposition des touches diffère un peu de celle d'un clavier PC.
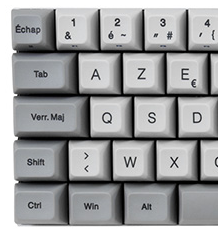
Le passage de l'un à l'autre n'est donc pas immédiatement naturel, a fortiori quand on abuse comme moi des raccourcis clavier. La touche maîtresse sur Mac est , qui est "mappée" sur la touche Win dont la position est inversée avec la touche Alt entre les deux types de clavier. Je me retrouve donc assez régulièrement à tenter des raccourcis clavier "alt-truc" en voulant taper ⌘-truc alors qu'il faudrait que je tape Win-truc (qui sur un clavier Mac donnerait "alt-truc"). C'est très frustrant sur macOS où je passe le plus clair de mon temps, mais pas sur d'autres OS où la touche utilisée pour les raccourcis est ctrl.
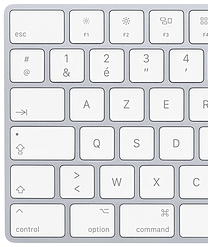
Autre aspect un peu pénible : sur un clavier Apple, la touche ⌘ est en deux exemplaires, de part et d'autre de la barre espace. Sur les claviers PC la touche Win n'existe qu'à gauche. Et ça s'est compliqué car la réalisation de certains raccourcis juste avec la main droite n'est plus possible tout en étant parfois trop tendue pour la main gauche, ce qui impose de faire Win avec la main gauche et la lettre ad-hoc avec la main droite. Les utilisateurs PC de longue date n'ont pas forcément ce souci, au moins ils en ont l'habitude et leurs doigts ne cherchent pas un raccourci que jamais ils ne trouvèrent. Dans le même ordre d'idée, l'emplacement du signe moins sur un clavier PC est une calamité incroyable, très hors d'atteinte alors qu'il (me) sert littéralement tout le temps. Sur clavier Apple il est à la place du signe égal à gauche de la touche Retour Arrière ce qui le rends très facile d'accès sans traverser tout le clavier.
Je pourrai continuer un certain temps sur les différences entre clavier Apple et clavier PC. C'est totalement pertinent dans mon vécu quotidien avec le ViBE mais cela concerne sans doute assez peu de gens car j'imagine que la majorité des utilisateurs de ViBE utilisaient déjà un clavier PC auparavant.

L'accès aux touches de fonction en surcouche de la rangée numérique du haut du clavier n'est par contre pas un souci. J'utilise très peu les touches fonction et sur Mac je suis déjà habitué à devoir activer la touche Fn pour y accéder. Simplement ici la touche Fn n'est pas au même endroit que sur Mac.

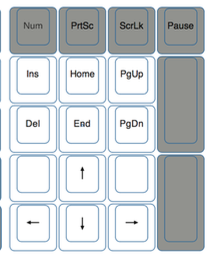
L'accès aux flèches et autres touches de navigation se fait sur le pavé numérique, immédiatement car par défaut le pavé n'est pas en verrouillage numérique. Cela se fait très naturellement et sans regarder tant leur disposition est proche de ce que l'on trouve sur des claviers étendus classiques. C'est très agréable car ça tombe naturellement sous les doigts.
Ce fonctionnement que Vortex nomme "Tenkeyless mode" (en référence aux claviers TKL) neutralise malheureusement les touches moins, plus et entrée du pavé numérique : moins devient pause, plus et entrée ne font rien. C'est à mon avis un mauvais choix, j'aurais largement préféré que ces touches gardent leur fonction native.

Mais mon vrai souci avec le ViBE c'est l'accès aux chiffres du pavé numérique. Il se fait via le verrouillage numérique : sur Mac il faut presser Fn+Numlock alors que sur les autres OS il faut presser Numlock. Déjà c'est un problème si vous passez d'un OS à l'autre fréquemment, mais ce n'est pas tout. La course des touches est sensiblement plus longue que sur mes claviers Apple Alu, si bien qu'il m'arrive assez fréquemment (tapant trop vite) de rater l'activation soit de Fn soit de Numlock, quand je tape la combinaison de touches (sous réserve que j'ai pensé à le faire). Il y a bien une LED sur le clavier pour indiquer que le pavé numérique est activé, malheureusement elle se trouve sous la touche capslock. Cette touche est totalement masquée à ma vue par ma main gauche quand je suis en position de frappe. Si bien que pour valider le mode de fonctionnement du pavé numérique, je dois faire une pause dans ma frappe, décaler ma main gauche et alors seulement je sais si je vais taper des chiffres ou déplacer mon curseur avec l'autre main.
Cette partie de l'expérience utilisateur n'est pas du tout agréable et de dépit je me trouve parfois à taper des chiffres sur la rangée du haut ce qui est bien plus lent que sur le pavé numérique mais à l'avantage de ne pas envoyer mon point d'insertion de balader si je rate l'activation du verrouillage numérique. Par ailleurs mon utilisation des flèches est aussi très importante (rappel de commandes dans le terminal, sélection des messages dans le webmail du boulot, etc.). Donc impossible de laisser le pavé numérique en Numlock en permanence.
Pour moi c'est une régression sérieuse. Sur un clavier normal je vais pouvoir taper d'une seule traite des chiffres, lettres, positionner mon curseur ou rappeler une commande avec les flèches, etc. Sur le ViBE c'est un vrai saut d'obstacles. Il serait bien plus agréable avoir la LED sous la touche Numlock et que cette dernière soit utilisable directement sur Mac sans recours à la touche Fn. C'est pour moi un vrai problème de conception.

Bref, j'aime bien le ViBE mais j'ai sérieusement hâte d'avoir un Vortex Tab90M sur mon bureau.

Related posts

Escaping the Apple ecosystem: part 2

In part 1, I've written about the BoM of my project and the associated to-do list.
First item on this list was: build the box. That did not go as smoothly as expected. The motherboard was not fully operational: after few minutes of run time (between 5 and 30), it would trigger a CPU overheat alarm, even when the CPU was idle and cool. Supermicro's Support made me tried a new BIOS, with no effect, so I've finally send the board for exchange. The new board arrived but I've had to delay the rebuilt for few weeks.
Now the PC is up and running. The new motherboard seems to work great, but I've not tested IPMI yet. IPMI was the very first feature I've used on the first board, and there is a slight probability that the CPU overheat problem comes from a probe malfunction related to the BMC. Let's keep that for later.

I've chosen to run this box on VMware ESXi 5.5, because it's quite common (more than the latest 6.x), because it sports features I need like passthrough, and because most VMware based multi-sit PC projects like mine are using ESXi 5.x.

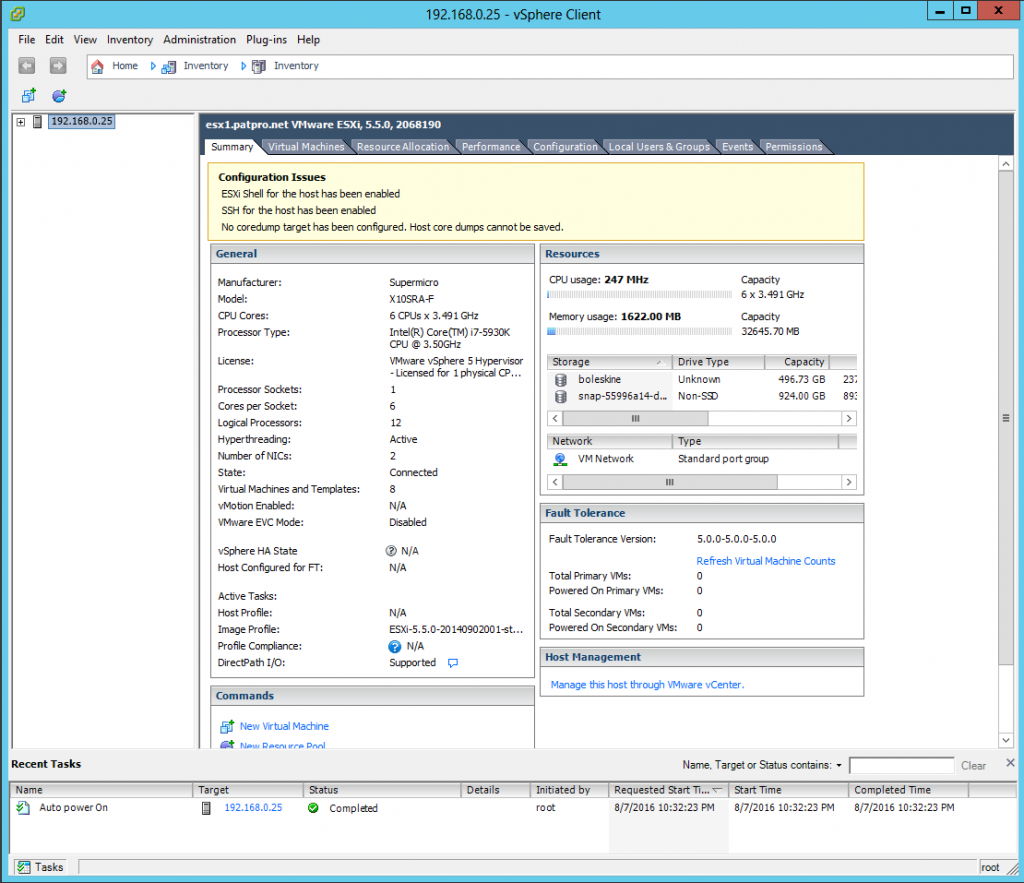
ESXi is quite easy to install, I won't give details. Main hdd in the box is installed with ESXi, which is configured thanks to a USB keyboard and a display plugged in the VGA port of the motherboard. After basic configuration (network, user password...), I've switched to remote configuration through VSphere Client, installed on a Windows PC (really a VM running on the Mac).

General view

General view of ESX's configuration


Configuring passthrough for GPUs is pretty straightforward, because I've started with only one GPU, and because these are discrete PCI cards. On the other hand, passthrough of USB controller can be tricky: many controllers, nothing to identify them except trial & error (unless you have the blueprint for your motherboard telling what physical USB ports belong to what controller).
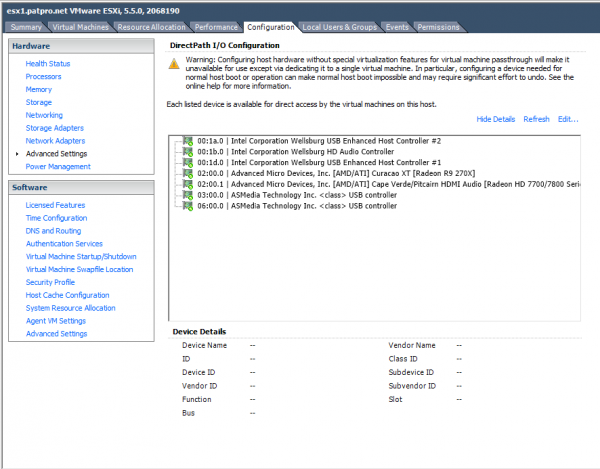
Go to configuration tab, then "Advanced", and finally click "edit" on the right

Go to configuration tab, then "Advanced", and finally click "edit" on the right


When you click "Edit…" a window opens that lists interesting devices you can try to passthrough.
Choose some. Then you have to reboot the ESXi and add some of these devices to a VM.
passthrough
I've created a Windows 7 pro 64bits VM, with raw device mapping pointing to an SSD. I've added every available PCI devices to this VM (USB, sound, GPU) and installed Windows plus updates.
It's important to remember that initially, most PCI devices might not work at all because of missing drivers on guest OS (here it's Windows). Hence, after installing Windows, the Radeon was detected but not used, and only Intel USB controllers where working. I've installed AMD drivers, and ASMedia drivers (courtesy of Supermicro). I've also installed VMware Tools.
After all this, the Windows VM properly uses my Dell display hocked-up on the MSI R9 270x Radeon, and I can interact with the system thanks to a real keyboard and mouse. Passing through the whole USB controller allows me to use any USB device I want. I've successfully plugged-in and used a thumbdrive, a USB gaming headset and a USB hub.
I've made some GPU/CPU benchmarks and everything looks perfect. I've tested Left 4 Dead 2 game play, and it looked great too (I'll probably have to tweak anti aliasing settings to make it perfect).

The Windows part was quite fast to setup, and is almost done now. I've started to fight with OSX and Ubuntu, but things are not easy with both of them. It looks like my 3 years old graphics card it so new that OSX does not support it until 10.11.x, and Ubuntu won't allow me to install Radeon drivers on 16.x LTS because they wait for some software to stabilize before packaging it…

To-do list:

  • fix problems with OSX and Ubuntu virtualization
  • find another MSI Radeon R9 270X GAMING 2G (of course it's no longer in stock…)
  • fully test Mac OS X 10.6.8 with Mac's graphics card instead of MSI Radeon
Related posts

Escaping the Apple ecosystem: part 1

X10SRA-F_specBack in late 2012, I've started to think about my post-Apple days. I knew already that I would not endorse the full cloud crap, and the oversimplification of OS X that follows the iOS convergence. My hardware, my OS, my data.

I'm still running a Mac Pro 2010, with Mac OS X 10.6.8, the last great OS from Apple. Unfortunately (in)security is not what it used to be, and browsers, ssl libraries, etc. are updated frequently and older OSes are no longer supported. So it was time to switch away from 10.6.8 for my online activities. Meaning, it's time to create my multi-headed workstation running various OSes with dedicated GPU.

After about a year spent looking for the right pieces of hardware, I've came up with this BOM:

Hopefully it will yield to great results with virtualization, passthrough of GPUs and USB.
For now, only one GPU, just in case it's not working accordingly. That will allow me to test every OSes I want to use with GPU passthrough. I'll buy 2 more GPUs when it's fully tested and satisfactory.

To do list:

  • Assemble the workstation
  • Install and patch VMWare (to allow the virtualization of Mac OS X on non-Apple hardware)
  • Test each VM with GPU+USB+Sound passthrough

Due to the exotic nature of some of these pieces of hardware, I've had to order them from four retailers in two countries: Amazon (France), LDLC (France), PC-Cooling (Germany) and MindFactory (Germany).

I've got only one delivery problem, for the PC case: it was delivered through GLS Group, and it took them more than a week to drive 10 km from their warehouse to my home. When it finally went through my door, the box was trashed and the PC case had one foot slightly hammered into the case. It can't stand still on its 4 feet.
Whatever you buy abroad, just make sure it won't be delivered through GLS. The driver was a pain in the ass, calling me to delay the delivery.

Related posts

Mac OS X on VMware ESXi: hardware challenges

I've decided to try and build a virtualized workstation that would allow me to use multiple OSes on top of my Mac Pro. That's no piece of cake, because it mainly boils down to using a professional hypervisor optimized for hardware abstraction and headless operation as a power-user workstation with full hardware access and as much GPU power as possible. It does not look like something that has a bright future, does it?

After some experiment I have a pretty good idea of what is possible and what is not possible. Lets compare the Mac Pro's hardware and what you can access from within a virtual machine running in ESXi on the same Mac Pro:

Mac Pro VM
CPU Full power with HT No HT, number of cores depends on the VM setup, but frequency can be lower than expected.
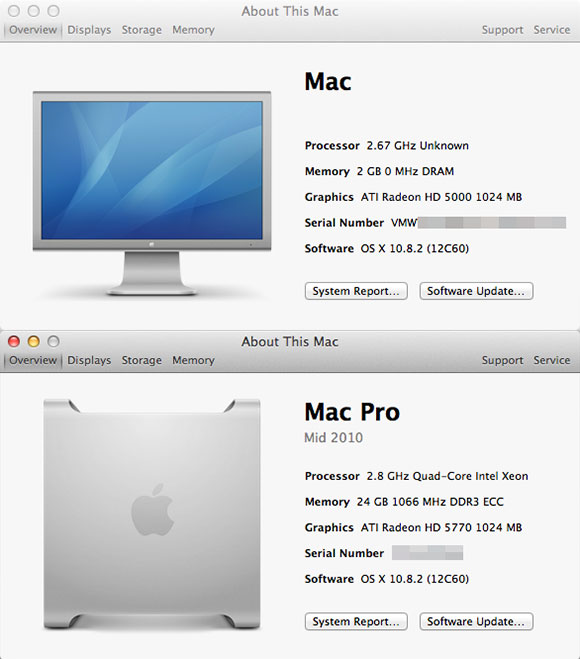
Running OS X 10.8 I got 2.66 GHz in the VM despite the 2.8 GHz Xeon
RAM Full RAM Depends on the VM setup, but if you use device passthrough, you must reserve the full amount of RAM, meaning you lose the ability to share unused RAM with other VMs. If you are a virtualization expert you know it's not good.
SATA Full access Possibility of raw device mapping
USB Full access, plug & play Passthrough available but limited: no keyboard and no mouse. Probably no plug & play either. Tested with logitech headphones: flaky sound with kernel log message complaining about a problem in USB driver, any app (itunes, chrome...) won't play sound any longer than 2 or 3 seconds before shutting down the sound output.
Bluetooth Full access none pseudo-passthrough available via USB devices, not tested.
Wifi Full access Passthrough possible, but not tested
LAN Full access Passthrough possible, not tested. Otherwise access via the virtual network stack of the hypervisor, works well.
Firewire Full access, plug & play none.
Graphics card Full access Passthrough possible, with a performance drop.
Some softwares will just not work, see last part of this post for details.
DVD Full access Passthrough possible, not tested.
Access via VCenter possible.
Optical sound output Full access none Passthrough of the Intel HD sound controler possible, but playback is out of sync, and so flaky it's unusable. On windows the sound device application commits suicide, on OS X the sound output is not even available.

This chart means important things. Running a virtualized Mac OS X workstation on top of ESXi will prevent me from:

  • using 100% CPU power (not that important)
  • using 100% of my RAM (not that important)
  • using 100% of my already limited GPU power (kind of important)
  • plug in USB devices like thumbdrives (important)
  • plug in Firewire devices like my CF-card reader (important)
  • accessing bluetooth device (I don't care)
  • using my optical Edirol MA-15D or any other good speaker (important)

Lets face it, those limitations alone could bring my project to a halt. I don't want a crappy workstation, and if virtualization is not the way to go, I might go the other way around and buy a small PC for every other OS I want to run. Even if it defeats the all-in-one purpose of the virtualization, it would allow me full access to each hardware resources.

Below, the "About this Mac" dialog featuring the VM on top and the real Mac Pro under.

comparison of about this mac dialog between OS X VM, and OS X running on the Mac Pro

Even simple hardware features are not well recognized, but it's enough for the average user experience. The GPU passthrough allows decent full screen 1080p HD video playback from youtube, and many games should work too. Unfortunately Valve's games won't work (Left 4 Dead…) as they make use of some framework that fails on Virtualized hardware.

hl2_osx[772]: -[__NSCFString bytes]: unrecognized selector sent to instance 0x2827350
hl2_osx[772]: An uncaught exception was raised
hl2_osx[772]: -[__NSCFString bytes]: unrecognized selector sent to instance 0x2827350
hl2_osx[772]: (
 0   CoreFoundation      0x988b212b __raiseError + 219
 1   libobjc.A.dylib     0x9545352e objc_exception_throw + 230
 2   CoreFoundation      0x988b5d9d -[NSObject(NSObject) doesNotRecognizeSelector:] + 253
 3   CoreFoundation      0x987fe437 ___forwarding___ + 487
 4   CoreFoundation      0x987fe1e2 _CF_forwarding_prep_0 + 50
 5   CoreFoundation      0x9878d720 CFDataGetBytePtr + 80
 6   launcher.dylib      0x0041c955 _ZN12GLMDisplayDB17PopulateRenderersEv + 2005
 7   launcher.dylib      0x00418607 _ZN12GLMDisplayDB8PopulateEv + 23
 8   launcher.dylib      0x0041b18f _ZN9CCocoaMgr12GetDisplayDBEv + 159
 9   shaderapidx9.dylib  0x0b28fb47 _ZN10IDirect3D921GetAdapterDisplayModeEjP15_D3DDISPLAYMODE + 55
 10  shaderapidx9.dylib  0x0b2db946 _ZNK19CShaderDeviceMgrDx818GetCurrentModeInfoEP19ShaderDisplayMode_ti + 38
 11  engine.dylib        0x05dbdeaa _Z14Shader_Connectb + 122
 12  engine.dylib        0x05f1232a _ZN10CEngineAPI7ConnectEPFPvPKcPiE + 106
 13  launcher.dylib      0x004151c3 _ZN15CAppSystemGroup9OnStartupEv + 115
 14  launcher.dylib      0x00415575 _ZN15CAppSystemGroup3RunEv + 37
 15  launcher.dylib      0x00415598 _ZN15CAppSystemGroup3RunEv + 72
 16  launcher.dylib      0x0041d202 _Z18MainFunctionThreadPv + 82
 17  launcher.dylib      0x0041d56c ValveCocoaMain + 140
 18  launcher.dylib      0x0040ca61 LauncherMain + 673
 19  hl2_osx             0x00001d26 start + 54
 )

I've discovered that the [__NSCFString bytes]: unrecognized selector sent to instance error affects also Hackintosh users, ie. people running Mac OS X on top of non-Apple hardware.

Next step: try Valves games on the Windows VM, with GPU passthrough.

Related posts

Escaping the Apple ecosystem: part 0

Years from now, I've understood that the evolution of the Apple ecosystem would eventually become an ethic and practical problem for me and for other longtime Mac OS X power users. I will not give details here, but it's closely related to constant patent fights, proprietary appstores and their underlying business model, lack of professional hardware and software, lack of openness, iOS convergence, etc.
The fact is, I'm deeply addicted to Mac OS X (10.6 branch). It sports great functionalities, from great APIs, and is very nice to use (unless you are a linux control freak upset by the quite limited Window Manager of Mac OS X).
From my standpoint it has critical functionalities that I would miss a lot on other OSes, some of them I use more than ten times a day. For example, the ⌘-k combo that allows me to connect to WebDAV, AFP, NFS, and CIFS shares, to VNC servers… So convenient, so irreplaceable. I could find dozens different little (or big) things that make me stick with Mac OS X. Some of them are quite huge: it's not Windows, it runs my software (Adobe's CS5, Valve's L4D2, my beloved text editor BBEdit and many more), it's UNIX under the hood - and I must admit, the hood is constantly open.
I do understand of course that Apple is right about consumer products, they have a very good business model, and the recent rumor about a switch to ARM's CPU makes so much sense. But I'm no regular consumer. I spend 10 to 18 hours a day in front of various computers, have neither smart phone nor facebook account.
Unless I'm ready to give up much control to Apple, there's no way I move to iOS OSX 10.8 / 10.9. That's why I'm studying a path to escape the Apple ecosystem. I want it to be a slow process, allowing me to progressively switch from Mac OS X to something else.

Step zero

I think about step 0 as the core of my project, as the main idea. And that would be to keep on using Mac OS X. Huge step, uh? No kidding.
I'm currently evaluating various solutions that would allow me to:

  • keep Mac OS X as my main OS
  • use Windows, FreeBSD, linuxes as alternative OSes at the same time
  • enjoy full hardware power (use full GPU power, not emulated, not virtualized)
  • never reboot (I'm used to 15-50 days uptime, rebooting to change OSes is not an option)

Hence, I would be able to slowly switch my habits from Mac OS X to other OSes. Some softwares I need (Adobe's for example) will stay on Mac OS X until I buy a new version running on another OS, or until I find a nice alternative. That will take time.

In theory my step 0 would require at least:

  • A bare metal hypervisor running on my Mac Pro
  • a Mac OS X virtual machine capable of using natively USB ports, GPU, and SATA
  • a Windows virtual machine capable of using natively USB ports and GPU
  • optional: a linux VM capable of using natively USB ports and GPU

I've got plenty of power (2.8 GHz quad core Xeon), and plenty of RAM (24 GB). But believe it or not, that's not enough. For example, it's not possible to share the GPU between two active virtual machines. If you want direct I/O ("passthru" mode) for your graphics card, you need one card per active VM. That's not a real problem, My Mac Pro has few empty PCI slots, I can buy a fanless ATI Radeon or two as dedicated graphics cards for VMs.

As far as I know, VMware ESXi 5.1 is the only bare metal hypervisor supporting Mac Pro model 5,1 (mine). And VMware is also the only one supporting Mac OS X 10.6 (server) virtual machine on top of bare metal hypervisor (on top of Apple hardware). Fine.
VMware has "DirectPath I/O" that allows direct bind of a PCI device into a VM. For example, you can create a virtual machine and make it use the PCI GPU directly, so that you would have proper video power inside your VM.
Unfortunately this passthrough mode has severe limitations. Biggest ones are:

  • You can no longer create snapshot of your VM
  • You can no longer suspend your VM

I've installed VMware ESXi 5.1 on a spare SATA hdd into my Mac Pro. I've created a Windows virtual machine, and hooked the PCI graphics card on this VM using DirectPath I/O. It worked great. As soon as I've installed ATI drivers, the display plugged on the Mac Pro was reclaimed by the Windows VM. I was not able to dedicate USB ports to the VM, so for now it's kind of useless. Trying to launch a Valve game (Half Life Lost Coast) eventually fails. Probably a software configuration problem.
The same setup for a Mac OS X VM won't boot. I'm able to boot a Mac OS X virtual machine, using my very own SATA hdds in raw device mapping (ie. it boots my regular Mac Pro OS, from its physical hdds, as a VM). But if I try to use the ATI card via DirectPath I/O, it won't boot.

I'm stuck at step zero, with important questions asked, and not answered:

Is it possible to use GPU card passthrough with a Mac OS X guest? (also here)
Is it possible to configure USB passthrough on a Mac Pro with ESXi 5.1?

Feel free to help (and to correct my english). I really need those issues to be solved in order to move forward with this project.

helpful links:
fan speed of the ATI card with ESXi 5.1
Raw Device Mapping of local SATA disks on ESXi
ESXi as a Desktop with VMDirectPath I/O

Related posts

PowerMac à vendre, 350 € (vendu)

Je vends mon Power Mac G5, tour bi-processeur PPC 2GHz. Il dispose de 3,5 Go de RAM, d'un disque dur 1To, d'une carte Airport, d'une carte ethernet Apple supplémentaire.
L'annonce complète est visible sur le bon coin, mais vous pouvez aussi me contacter directement via les commentaires.

Livré avec Mac OS X 10.5, clavier/souris Apple, il est à retirer sur place (je n'ai pas de voiture).

Related posts

Benchmark Left 4 Dead 2, sur Mac Pro

La plupart des "gamers" vous le diront, la bonne machine pour les jeux, c'est celle qui fait tourner Windows. Si on met de coté les consoles de jeux dédiées, ils n'ont pas tort. Comparés à ceux de Mac OS X, les pilotes vidéo Windows sont plus performants, voire dans certains cas vraiment beaucoup plus performants. Les cartes vidéo disponibles sont aussi plus récentes, et les jeux programmés en DirectX sont bien sûr nativement privilégiés, puisque DirectX n'est pas disponible sur Mac OS X.
Ceci posé, j'ai décidé de faire des tests pour déterminer quels réglages vidéo sont les meilleurs pour jouer confortablement à Left 4 Dead 2 sur (mon) Mac. À titre indicatif, il s'agit d'un Mac Pro mono Xeon quad-core 2,8GHz, 3Go de RAM (DDR3), ATI Radeon HD 5770, sous Mac OS X 10.6.6.

Pour faire un benchmark L4D2 sur PC ou Mac, il faut procéder à plusieurs manipulations que je ne vais pas détailler. Sachez juste qu'il faut activer la console développeur dans les préférences du jeu. Grace à cette console, vous allez pouvoir enregistrer une "demo", c'est à dire le script d'une partie. Ensuite il faut rejouer ce script avec différents réglages vidéo, et enregistrer le nombre d'images par seconde que votre machine génère pendant le rendu vidéo de cette "demo". C'est long et fastidieux, et il est impossible (et stupide) de tester tous les réglages vidéo. Si j'avais voulu faire une mesure pour chaque combinaison de réglages, sans changer la résolution, il aurait fallu que je fasse 2700 rendus de ma partie enregistrée.

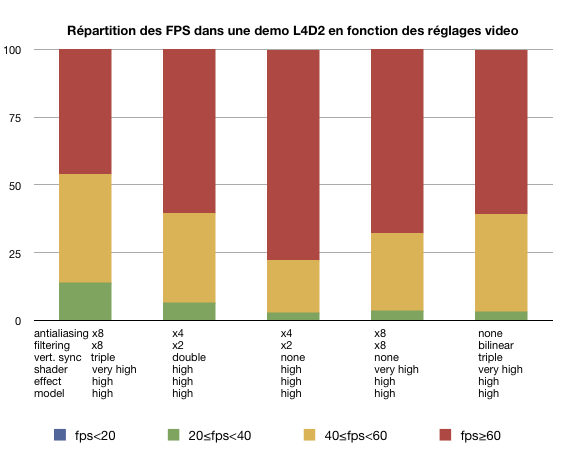
J'ai donc pris le parti de lancer 5 fois la partie enregistrée, toujours dans la même résolution (1920x1200), et toujours avec les paramètres "effects" et "model" au maximum.

Voici le résultat sous la forme d'un graphique :
bench_l4d2_macpro PNG 24bit

En rouge, est représenté le pourcentage d'images qui sont calculées à la vitesse de 60 images par seconde ou plus. Donc plus la proportion de rouge est grande, plus la carte video calcule vite le rendu de la partie. Et plus la proportion de vert et de bleu est faible, moins vous avez de ralentissements perceptibles dans le rafraîchissement de l'image. Ici le bleu (moins de 20 fps) est totalement absent.
Le jeu est capable d'afficher des chiffres de FPS ("frame per second") supérieurs à 60, mais le système intégré qui enregistre la répartition des FPS considère qu'à partir de 60 images par seconde il n'est plus utile de donner la répartition des FPS.
Ce n'est pas gênant, car in fine, les écrans actuels sont assez limités en terme de rafraîchissement, et que 60 images par seconde, c'est suffisant pour un affichage stéréoscopique à 30 images par seconde pour chaque œil. Donc à partir de 60 FPS, même un joueur exigeant pourrait jouer avec des lunettes 3D confortablement.

On voit sur ce graphique qu'un réglage a énormément d'impact sur le nombre de FPS : la synchronisation verticale. Si la synchronisation verticale est activée, le jeu ne peut pas dépasser 60 images par secondes, et le nombre global de FPS est sensiblement réduit. Mais ce réglage garanti une certaine cohérence de l'affichage et prévient l'apparition d'artefacts graphiques qui peuvent dénaturer l'expérience du joueur. Si votre machine le permet, laissez la synchronisation verticale activée. Les réglages 3 et 4 montrent l'impact de la désactivation de cette synchronisation sur la répartition des FPS.

Je ne vais pas plus loin dans l'analyse, il est aisé de comparer chaque jeu de réglages en utilisant le graphique. Si vous souhaitez faire le même benchmark que moi exactement, il vous faut le script de la partie que j'ai enregistré (ZIP 3,6Mo). La partie dure environ 10 minutes. L'archive contient un fichier parish000.dem qui est le script de la partie, et un fichier parish000.vdm qui est un fichier texte contenant les commandes qui lancent l'enregistrement des FPS au début du rendu, et qui arrêtent l'enregistrement à la fin du rendu. Il faut placer ces deux fichiers dans /left 4 dead 2/left4dead2 (je ne donne pas le chemin complet il est différent sur Mac OS X et Windows).
Après avoir joué la partie sur votre machine, vous obtiendrez un fichier prof_c5m4_quarter.csv situé dans /left 4 dead 2/update/. Attention, ce fichier est écrasé à chaque lancement de la "demo".
Je vous renvoie vers les forums et les aides en ligne pour tous les détails techniques (comment lancer une "demo", etc.).

Addendum

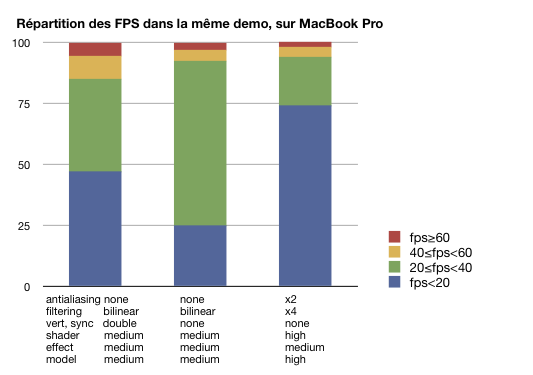
À titre de comparaison, voici le même benchmark effectué sur un MacBook Pro (un portable donc), doté d'un Core Duo 2,8 GHz, de 8 Go de RAM DDR3, et d'une carte vidéo GeForce 9600M GT. La résolution est native : 1440x900. J'ai tenté de faire le test avec les réglages vidéo "recommandés" par le jeu, l'écriture du fichier de log des FPS a échoué, mais les résultats étaient de toute manière catastrophiques.
bench_l4d2_macbookpro PNG 24bit
À gauche, un jeu de réglages "tout medium" avec antialiasing et filtering au minimum. Au centre, les mêmes réglages mais avec la synchronisation verticale désactivée. Enfin à droite le jeu de réglages "recommandés" par L4D2, mais avec la synchronisation verticale désactivée. Le résultat reste injouable, avec presque 75% des frames générées à moins de 20 fps.

Related posts