Créer un trou noir DNS

Même si la question a déjà été largement traitée, je livre ici ma propre version d'un trou noir DNS. Le DNS blackhole, en anglais dans le texte, permet par exemple de s'assurer (dans une certaine mesure) que les utilisateurs de votre réseau ne peuvent pas se connecter trop facilement à des sites web vecteurs d'infection.
Le fonctionnement est simple : vous avez un réseau local, chez vous ou dans votre entreprise, et vous mettez à disposition de vos utilisateurs un serveur DHCP pour que les équipements qui se connectent puissent obtenir une adresse IP. Je pars du principe que sur ce réseau local, vous disposez aussi d'un serveur DNS. Un utilisateur se connecte avec votre réseau : le serveur DHCP lui donne une adresse IP pour que la nouvelle machine puisse parler sur le réseau, et fourni aussi l'adresse de votre serveur DNS. C'est donc par ce serveur que vous maitrisez que la machine de l'utilisateur va convertir les noms de domaine (www.patpro.net) en adresse IP (193.30.227.216).
Comme vous avez la maîtrise du serveur DNS, vous avez la maîtrise de la résolution des noms de domaine. Vous pouvez donc décider de bloquer la résolution de certains noms de sites web qui posent problème (gros pourvoyeurs de malware, régies publicitaires, facebook, etc.).

Je vais me baser ici sur la liste de malwaredomains.com qui regroupe environ 20000 noms de domaine qui sont, ou ont été, impliqués dans la distribution de malware (en général en infectant le visiteur imprudent). Il s'agit donc pour moi de défendre mon réseau en protégeant les utilisateurs.

Les informations sont largement inspirées - voire pompées - de la prose anglophone de Paul.

Pré-requis : un serveur DNS BIND que vous maîtrisez, et un réseau avec serveur DHCP qui indique l'adresse IP du DNS, de sorte que les clients qui se connectent utiliseront par défaut le serveur DNS sus-mentionné. Il faut bash, curl, et jot (sur linux il faut remplacer jot par seq).

Obtenir la liste des zones DNS à mettre en trou noir.

Préparer le lieu de stockage :

mkdir /etc/namedb/blackhole

J'utilise le script suivant, à lancer en root via une crontab (une fois par semaine suffit) :

#!/usr/local/bin/bash
PATH=/usr/local/sbin:/usr/local/bin:/sbin:/bin:/usr/sbin:/usr/bin
ZONEFILE=/etc/namedb/blackhole/spywaredomains.zones
MIRRORS[1]="http://mirror1.malwaredomains.com/files/spywaredomains.zones"
MIRRORS[2]="http://mirror2.malwaredomains.com/files/spywaredomains.zones"
MIRRORS[3]="http://dns-bh.sagadc.org/spywaredomains.zones"

# fonctionne sur BSD uniquement, pour linux il faut
# remplacer par `seq`
CHOOSE=$(jot -r 1 1 ${#MIRRORS[@]})

if [[ "$(/usr/local/bin/curl ${MIRRORS[CHOOSE]} -z ${ZONEFILE} -o ${ZONEFILE}_new -s -L -w %{http_code})" == "200" ]]; then
	rm -f ${ZONEFILE}_old
	mv ${ZONEFILE} ${ZONEFILE}_old
	mv ${ZONEFILE}_new ${ZONEFILE}
	named-checkconf -z | grep -v ": loaded serial"
	if [ ${PIPESTATUS[0]} -eq 0 ]; then
		service named restart
	else
		echo "Error loading new zone file, reversing..."
		mv ${ZONEFILE} ${ZONEFILE}_invalid_$(date "+%Y%m%d")
		mv ${ZONEFILE}_old ${ZONEFILE}
	fi
fi

C'est loin d'être foolproof, mais ça fait le travail. Les options de curl permettent de ne télécharger le fichier que si il a été modifié depuis votre dernière mise à jour. le script choisit un miroir au hasard au moment de faire le comparatif ce qui évite de charger toujours le même serveur.

Configurer BIND pour gérer les zones téléchargées.

Il faut ajouter dans la configuration du serveur DNS une directive d'inclusion du fichier téléchargé ci-dessus. Il suffit pour cela d'ajouter la ligne suivante à la fin du fichier /etc/named/named.conf :

 include "/etc/namedb/blackhole/spywaredomains.zones";

Le fichier spywaredomains.zones fait pointer chaque zone vers un unique fichier de définition qu'il convient de créer et de renseigner : /etc/namedb/blockeddomain.hosts.
Ce fichier contient une définition minimaliste de zone DNS BIND. Faites-la pointer vers un serveur web existant, cela vous permettra d'afficher à vos utilisateurs une page web d'explication :

$TTL    86400   ; one day
@       IN     SOA    NOM-DE-VOTRE-SERV-DNS. NOM-DE-VOTRE-SERV-DNS. (
	1
	28800   ; refresh  8 hours
	7200    ; retry    2 hours
	864000  ; expire  10 days
	86400 ) ; min ttl  1 day

	NS     NOM-DE-VOTRE-SERV-DNS.

	       A       IP-DE-VOTRE-SERVEUR-WEB
*	IN     A       IP-DE-VOTRE-SERVEUR-WEB

Si vous ne souhaitez pas informer vos utilisateurs, remplacez simplement IP-DE-VOTRE-SERVEUR-WEB par 127.0.0.1. Mais je recommande tout de même la publication d'une page web d'information sur la quelle les utilisateurs pourront arriver si ils tentent de joindre un domaine présent dans la liste noire.

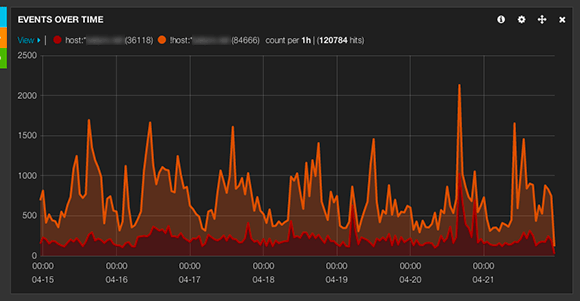
Avec ça, votre serveur DNS est transformé en trou noir pour l'ensemble des domaines répertoriés chez malwaredomains.com. En analysant les logs de votre serveur web, vous pourrez aussi déterminer rapidement qui sur votre réseau est infecté ou risque de l'être.

Références.

edit : correction d'une coquille dans le script

Related posts

Chiffrer un répertoire sur FreeBSD avec PEFS

La sécurité des données numériques est au cœur des enjeux actuels, et pas seulement pour les professionnels. Pouvoir chiffrer ses propres données pour les rendre inutilisables pour un voleur éventuel, est donc une nécessité. Sous FreeBSD il est possible de faire du chiffrement sur l'ensemble du disque avec geli(8) ou gbde(4), ou sur un répertoire uniquement avec PEFS. Les deux premières solutions opèrent un chiffrement au niveau bloc. Elles travaillent sur des devices de taille fixe, et ne protègent pas vos données si un pirate accède à la machine quand elle est allumée et que les disques chiffrés sont montés.
PEFS permet de travailler sur un répertoire donc sans avoir à fixer un volume arbitraire au moment de l'initialisation. Le chiffrement se fait au niveau fichier avec une ou plusieurs clés autorisant la hiérarchisation des accès.

fichiers-chiffres-avec-PEFS

Installer PEFS

PEFS est disponible dans les ports et dans les packages. Il est recommandé de faire l'installation par les ports. En effet, l'outil contient un module pour le kernel, et un trop grand écart entre la version de votre noyau et celle qui a servi à la compilation du package peut générer un panic et geler votre système. Aussi, avec un processeur récent vous pourrez activer AES-NI au moment de la compilation du port (accélération matérielle pour le chiffrement AES).

$ cd /usr/ports/sysutils/pefs-kmod
$ sudo make install clean

Pour charger le module automatiquement au redémarrage, ajouter cette ligne dans votre /boot/loader.conf :

pefs_load="YES"

Utiliser PEFS

PEFS s'utilise assez simplement. Il faut commencer par créer un répertoire vide pour stocker les fichiers chiffrés. On peut créer un second répertoire qui servira de point de montage pour la version déchiffrée, mais le montage peut aussi se faire sur le premier répertoire.

$ mkdir ~/coffre.pefs ~/coffre

Ensuite on monte le répertoire (soit vers lui-même, soit comme ici vers un autre pour des raisons de clarté) :

$ sudo pefs mount ~/coffre.pefs ~/coffre

À ce stade, le répertoire ~/coffre est en lecture seule, car nous n'avons pas encore fourni de clé de chiffrement.

$ touch ~/coffre/toto
touch: coffre/toto: Read-only file system

L'ajout d'une clé est une étape simple, mais la documentation officielle manque légèrement d'explications. Il ne s'agit pas ici de fournir une clé une fois pour toute, mais de dire à PEFS de travailler pour la session courante avec cette clé. Si le répertoire est démonté, ou si les clés sont vidangées (flushkeys) il faudra fournir la même clé à nouveau pour accéder aux fichiers.

$ pefs addkey ~/coffre
Enter passphrase: (mot de passe pour (dé)chiffrer vos fichiers)
$ touch ~/coffre/toto
$ ls -A1 ~/coffre*
/home/me/coffre:
toto                               <- version en clair

/home/me/coffre.pefs:
.SfoQ93cCWWT+NnBB7EYE2ZK402YDSwsT  <- version chiffrée

Pour interdire l'accès à vos données vous pouvez simplement utiliser la commande flushkeys, ou aller jusqu'au démontage du répertoire:

$ pefs flushkeys ~/coffre
$ ls -A1 ~/coffre*
/home/me/coffre:
.SfoQ93cCWWT+NnBB7EYE2ZK402YDSwsT  <- version chiffrée

/home/me/coffre.pefs:
.SfoQ93cCWWT+NnBB7EYE2ZK402YDSwsT  <- version chiffrée
$ sudo pefs unmount ~/coffre
$ ls -A1 ~/coffre*
/home/me/coffre:
(vide)

/home/me/coffre.pefs:
.SfoQ93cCWWT+NnBB7EYE2ZK402YDSwsT  <- version chiffrée

Le démontage est facultatif, mais si vous utilisez PEFS dans des scripts, c'est sans doute plus propre. Aussi, faites bien attention, il est possible de monter plusieurs fois le même répertoire au même endroit ce qui peut déboucher sur des situations tout à fait inconfortables. En cas d'utilisation automatisée mettez les bouchées doubles sur les contrôles avant et après chaque commande.

Après le flushkeys, les données sont présentées uniquement dans leur forme chiffrée, mais vous y avez toujours accès ce qui vous permet par exemple de les exporter vers un cloud de sauvegarde (Amazon Glacier, par exemple) en toute sérénité.

Pour déchiffrer vos données, et en admettant que le répertoire soit déjà monté, il vous suffit de reproduire l'étape addkey avec la même clé :

$ pefs addkey ~/coffre
Enter passphrase:

Si à cette étape vous changez la valeur de la clé (volontairement ou par faute de frappe), la nouvelle clé sera acceptée par PEFS. Cette nouvelle clé ne vous donnera pas accès aux anciennes données bien évidemment. Par contre elle vous permettra de stocker de nouveaux fichiers, qui seront chiffrés grâce à cette nouvelle clé. C'est à la fois dangereux et pratique. Si la faute de frappe est votre ennemi vous pouvez jouer la prudence et utiliser un trousseau de clé. Le trousseau se trouve dans le fichier ~/coffre.pefs/.pefs.db et il stocke la ou les clés "officielles" de votre choix. L'initialisation du trousseau se fait avec la commande addchain :

$ pefs addchain -f -Z ~/coffre.pefs

Ensuite, il vous suffira lorsque vous fournirez votre clé de le faire avec l'option -c pour que votre saisie soit comparée au contenu du trousseau :

$ pefs addkey -c ~/coffre

Cela offre une sécurité intéressante mais impose aussi la contrainte d'avoir un fichier dont il faudra prendre soin (attention aux rsync qui pourraient le supprimer si vous utilisez PEFS pour stocker des sauvegardes dans un répertoire chiffrés).

Il existe d'autres possibilités au logiciel PEFS que je ne détaille pas ici, notamment celle de stocker dans le trousseau .pefs.db des chaînes de clés avec héritage parent-enfant, ou encore le module PAM pam_pefs.so qui permet de fournir le montage et le déchiffrement automatique du ~/ d'un utilisateur au moment où il s'authentifie.

Un peu de lecture

Wiki FreeBSD au sujet de PEFS
Tutoriel PEFS
Audit de sécurité rapide sur PEFS

Related posts

Giving up on Logstash

splunk-logoMore than six months away, I've put both Splunk and Logstash (plus ElasticSearch and Kibana) to trial. Since the beginning of my experiment, the difference between both products was pretty clear. I was hoping that ELK would be a nice solution to aggregate GBs of logs every day and more importantly to allow me and my team to dig into those logs.
Unfortunately, ELK failed hard on me. Mostly because of ElasticSearch: java threads on the loose eating my CPU, weird issue where a restart would fail and ES would become unavailable, no real storage tiering solution, and so on.
ElastickSearch looks like a very nice developer playground to me. It's quite badly - if at all - documented on the sysadmin side, meaning if you're not a developer and don't have weeks to spend reading API documentation you will have a hard time figuring out how to simply use/tune the product.
Also, this data storage backend has absolutely no security features (at the time I was testing Logstash). Just imagine you put valuable data into a remotely available database/storage/whatever and you're told that you are the one that should create a security layer around the storage. Imagine a product like SMB, NFS, Oracle DB, Postgres, etc. with zero access control feature, no role. Anyone who can display a pie chart in Kibana can gain full control of your ElasticSearch cluster and wipe all your data.
Logstash too has important issues: almost every setting changes require an application restart. Writing grok pattern to extract data is an horrendous process, and a new pattern won't be applied on past data. Splunk on the other hand will happily use a brand new pattern to extract values from past logs, no restart required.
Logstash misses also pipes, functions, triggers… Search in Kibana is not great. The syntax is a bit weird and you can easily find nothing just because you've forgot to enclose your search string with quotes… or is it because you put those quotes? And of course there is this strange limit that prevent you from searching in more than seven or eight months of data…

I've tried, hard. I've registered to not-so-helpful official mailing lists for Logstash and ElasticSearch and simply reading them will show you how far those products are from "production approval". I've used it alongside with Splunk, it boils down to this statement: Kibana is pretty, you can put together many fancy pie charts, tables, maps and Splunk is useful, reliable, efficient.

Yes, I'm moving to Splunk, @work and @home. My own needs are very easily covered by a Free license, and we are buying a 10 GB/day license for our +350 servers/switches/firewalls.

You might say that Splunk is expensive. That's true. But it's way less expensive to me than paying a full time experienced Java developer to dive into ElasticSearch and Logstash for at least a year. Splunk has proper ACL that will allow me to abide by regulations, a good documentation, and a large community. It support natively storage tiering, too.

ELK is a fast moving beast, it grows, evolves, but it's way behind Splunk in terms of maturity. You can't just deploy ELK like you would do for MySQL, Apache, Postfix, Oracle DB, or Splunk. Lets wait few years to see how it gets better.

Related posts

S’envoyer des SMS multilignes via l’API de free-mobile

Free vient de mettre à disposition de ses abonnés Free-mobile un moyen simple de générer via une API accessible en ligne des SMS à soi-même. L'utilisation est globalement très simple et tient presque toutes ses promesses (actuellement il ne semble pas possible de faire du POST, seul le GET fonctionne).
Il suffit aux intéressés de se rendre sur leur interface de gestion de compte Free-mobile, dans la section "Mes options", et d'y activer (vers le bas de la page) l'option ad-hoc. Une fois l'option activée, Free vous gratifie d'un mot de passe dédié à cet usage, et vous renseigne un peu sur le fonctionnement du service :

free-mobile-notification

Une fois l'option activée, l'utilisation se résume à une requête HTTP de cette forme :

curl 'https://smsapi.free-mobile.fr/sendmsg?user=***&pass=***&msg=coucou'

Vous recevez alors sur votre téléphone Free-mobile le SMS contenant le message "coucou".

La création d'un message multiligne est un peu plus délicate. La plupart des plateforme Unix/Linux envoie en guise de séparateur de ligne un \n qui se traduit par %0a une fois "url-encodé". Malheureusement, l'API n'accepte pas ce %0a et le message sera tronqué à la première occurrence.
Par contre, le séparateur de ligne \r, encodé en %0d est bien accepté par l'API Free-mobile. Il faut donc, avant d'envoyer un message sur plusieurs lignes, traduire les \n en \r.

J'ai conçu un script shell pour mes besoins personnels. Il prend ses données en entrée standard, par exemple via un pipe :

echo "mon message" | sms.sh

Ce qui est plus souple pour moi dans bien des situations, que de devoir invoquer le script et de lui servir le message comme argument, par exemple :

autresms.sh mon message

Voici donc le code de mon script qui prend les messages via stdin, et qui converti les \n en \r. Notez que le SMS à l'arrivée ne contient pas de saut de ligne, donc prévoyez des espaces en fin de ligne si vous ne voulez pas que la fin de ligne soit collée au début de la ligne suivante.

#!/usr/local/bin/bash  
#
# push notification via smsapi.free-mobile.fr
#
LOGGEROPT="-p security.notice -t SMS"
REPLOGG=1
REPMAIL=1
MAILTO=root
USR="****"
PSW="****"
URL="https://smsapi.free-mobile.fr/sendmsg"
CURL=/usr/local/bin/curl

report() {
        [ ${REPLOGG} -eq 1 ] && echo $@ | logger ${LOGGEROPT}
        [ ${REPMAIL} -eq 1 ] && echo $@ | mail -s "SMS $@" ${MAILTO}
}

eval $(${CURL} --insecure -G --write-out "c=%{http_code} u=%{url_effective}" \
        -o /dev/null -L -d user=${USR} -d pass=${PSW} --data-urlencode msg="$(cat|tr '\n' '\r')" ${URL} 2>/dev/null | tr '&' ';')

echo ${c} ${u}\&pass=***\&msg=${msg} | logger ${LOGGEROPT}

case ${c} in
        "200")
                exit 0
                ;;
        "400")
                report "parameter missing" ; exit 400
                ;;
        "402")
                report "too many SMS..." ; exit 402
                ;;
        "403")
                report "service unavailable for user, or wrong credentials" ; exit 403
                ;;
        "500")
                report "server error, try later" ; exit 500
                ;;
        *)
                report "unexpected result" ; exit 600
                ;;
esac

Utilisation :

echo "mon message 
sur plusieurs 
lignes" | sms.sh

Il reste à faire :
- ajouter l'enregistrement dans les log système de chaque utilisation du script sms.sh
- ajouter la gestion des codes de retour HTTP autres que 200.

Attention
Pour bénéficier d'une gestion d'erreur et d'une trace dans les log de la machine j'ai utilisé une grosse ruse très sale avec eval. Cela permet de créer des variables à la volée à partir de données fournie par l'utilisateur. C'est éminemment risqué car tout ce est qui généré par c=%{http_code} u=%{url_effective} sera évalué sans distinction (avec potentiellement des exécutions de code).
Pour un système de monitoring c'est un risque négligeable : les messages sont connus et fixés par le logiciel qui les génère, sans interaction avec l'utilisateur. Pour une utilisation dans tout autre mécanisme la prudence est requise.

Related posts

Log aggregation and analysis: logstash

Logstash is free software, as in beer and speech. It can use many different backends, filters, etc. It comes packaged with Elasticsearch as a backend, and Kibana as user interface, by default. It makes a pleasant package to start with, as it's readily available for the user to start feeding logs. For your personal use, demo, or testing, the package is enough. But if you want to seriously use LS+ES you must have at least a dedicated Elasticsearch cluster.

apache-log-logstash-kibana

Starting with Logstash 1.4.0, the release is no longer a single jar file. It's now a fully browsable directory tree allowing you to manipulate files more easily.
ELK (Elasticsearch+Logstash+Kibana) is quite easy to deploy, but unlike Splunk, you'll have to install prerequisites yourself (Java, for example). No big deal. But the learning curve of ELK is harder. It took me almost a week to get some interesting results. I can blame the 1.4.0 release that is a bit buggy and won't start-up agent and web as advertised, the documentation that is light years away from what Splunk provides, the modularity of the solution that makes you wonder where to find support (is this an Elasticsearch question? a Kibana problem? some kind of grok issue?), etc.

Before going further with functionalities lets take a look at how ELK works. Logstash is the log aggregator tool. It's the piece of software in the middle of the mess, taking logs, filtering them, and sending them to any output you choose. Logstash takes logs through about 40 different "inputs" advertised in the documentation. You can think of file and syslog, of course, stdin, snmptrap, and so on. You'll also find some exotic inputs like twitter. That's in Logstash that you will spend the more time initially, tuning inputs, and tuning filters.
Elasticsearch is your storage backend. It's where Logstash outputs its filtered data. Elasticsearch can be very complex and needs a bit of work if you want to use it for production. It's more or less a clustered database system.
Kibana is the user interface to Elasticsearch. Kibana does not talk to your Logstash install. It will only talk to your Elasticsearch cluster. The thing I love the most about Kibana, is that it does not require any server-side processing. Kibana is entirely HTML and Javascript. You can even use a local copy of Kibana on your workstation to send request to a remote Elasticsearch cluster. This is important. Because Javascript is accessing your Elasticsearch server directly, it means that your Elasticsearch server has to be accessible from where you stand. This is not a good idea to let the world browse your indexed logs, or worse, write into your Elasticsearch cluster.

To avoid security complications the best move is to hide your ELK install behind an HTTP proxy. I'm using Apache, but anything else is fine (Nginx for example).
Knowing that 127.0.0.1:9292 is served by "logstash web" command, and 127.0.0.1:9200 is default Elasticsearch socket, your can use those Apache directives to get remote access based on IP addresses. Feel free to use any other access control policy.

ProxyPass /KI http://127.0.0.1:9292 
ProxyPassReverse /KI http://127.0.0.1:9292 
ProxyPass /ES http://127.0.0.1:9200 
ProxyPassReverse /ES http://127.0.0.1:9200 
<Location /KI>
	Order Allow,Deny
	Allow from YOUR-IP 127.0.0.1
</Location>
<Location /ES>
	Order Allow,Deny
	Allow from YOUR-IP 127.0.0.1
</Location>

original data in µs, result in µs. Impossible to convert in hours (17h09)

original data in µs, result in µs. Impossible to convert in hours (17h09)

On the user side, ELK looks a lot like Splunk. Using queries to search through indexed logs is working the same, even if syntax is different. But Splunk allows you to pipe results into operators and math/stats/presentation functions… ELK is not really built for complex searches and the user cannot transform data with functions. The philosophy around Kibana is all about dashboards, with a very limited set of functions. You can build histograms, geoip maps, counters, compute some basic stats. You cannot make something as simple as rounding a number, or dynamically get a geolocation for an IP address. Everything has to be computed through Logstash filters, before reaching the Elasticsearch backend. So everything has to be computed before you know you need it.
Working with Logstash requires a lot of planing: breakdown of data with filters, process the result (geoip, calculation, normalization…), inject into Elasticsearch, taylor your request in Kibana, create the appropriate dashboard. And in the end, it won't allow you to mine your data as deep as I would want.
Kibana makes it very easy to save, store, share your dashboards/searches but is not very friendly with clear analysis needs.

Elasticsearch+Logstash+Kibana is an interesting product, for sure. It's also very badly documented. It looks like a free Splunk, but its only on the surface. I've been testing both for more than a month now, and I can testify they don't have a lot in common when it comes to use them on the field.

If you want pretty dashboards, and a nice web-based grep, go for ELK. It can also help a lot your command-line-illeterate colleagues. You know, those who don't know how to compute human-readable stats with a grep/awk one-liner and who gratefully rely on a dashboard printing a 61 billions microseconds figure.
If you want more than that, if you need some analytics, or even forensic, then odds are that ELK will let you down, and it makes me sad.

Related posts

Metasploit hearbleed scanner reliably crashes (some) HP ILO

Disclaimer: HP ILO Firmware involved here is NOT the latest available. ILO 3 cards were not affected.

Using Metasploit to scan my network for OpenSSL "Heartbleed" vulnerability I've been quite shocked to get a handful of alerts in my mailbox. Our HP C7000 was no longer able to talk to some of our HP Proliant blades' ILO.

oh-crap

Production was all good, and service was still delivered, but blade management was impossible: Metasploit's auxiliary/scanner/ssl/openssl_heartbleed.rb probe has just crashed six HP ILO 2 cards. That's funny, because the ILO firmware is not vulnerable to heartbleed, it's only vulnerable to the scanner...

heartbleed

I've made some tests to repeat the problem. It happens with a 100% reliability. Quite impressive.

Software versions:

Metasploit
Framework: 4.8.2-2013121101
Console  : 4.8.2-2013121101.15168
openssl_heartbleed.rb : downloaded on April the 22th.

HP ProLiant BL490c G6 (product ID 509316-B21), ILO 2 firmware undisclosed for security reasons.
Related posts

Log aggregation and analysis: splunk

As soon as you have one server, you might be tempted to do some log analysis. That can be to get some metrics from your Apache logs, your spam filter, or whatever time-stamped data your server collects. You can easily find small tools, or even create a home-made solution to extract info from these files.
Now imagine you have 100, 200, or even thousands of servers. This home-made solution you've created no longer suits your needs.
Different powerful products exist, but I'll focus on two of them: Splunk on one side, Logstash+Elasticsearch+Kibana on the other side. This post is dedicated to Splunk. Logstash will come later.

Both softwares are tools. These are not all-in-one solution. Exactly like a spreadsheet software which is unable to calculate your taxes unless you design a specific table to do so, you must use the software to create value from your logs. Installing and feeding logs into the software is not the end of your work, it's the very beginning.

Splunk is a commercial product. It's incredibly powerful out of the box, and its documentation is very good. Every aspect of the software is covered in depth with numerous examples. It also has an official support. Unfortunately Splunk is very (very) expensive, and no official rates are available online. Hiding the cost of a software is often the promise you won't be able to afford it.
Splunk is well packaged and will run effortlessly on many common systems. At least for testing. Scaling up requires some work. I've been told that apparently, scaling up to more than few TB of daily logs can be difficult, but I don't have enough technical details to make a definitive statement about this.
Rest assured that Splunk is a very nice piece of software. It took me only an hour from the time I've installed it on a FreeBSD server, to the time I've produced a world map showing spam filter action breakdown by location:

amavis-geoloc

One hour. This is very short, almost insane. The map is fully interactive, and you can click any pie chart to display the table of values and the search request allowing you to create this table:

splunk-table

The query syntax is quite pleasant and almost natural. The search box is very helpful and suggests "Common next commands", or "Command history" alongside with documentation and example:

splunk-search

Splunk has some other killing features like users management and access control, assisted (almost automated) regex design for field extraction, or its plugin system. The Field extraction "wizard" is quite impressive, as it allows you to extract new fields out of already indexed logs, without writing any regex nor re-indexing your logs. You just browse your logs, paste samples of data you want to extract, and it builds the filter for you.
Transactions are also a pretty damn great feature: they make correlation of different events possible (login and logout, for example), so that you can track complex behaviors.

More importantly, Splunk appears to be simple enough so any sysadmin wants to use it and does not get rebutted by it's complexity. It's a matter of minute(s) to get, for example, the total CPU time involved in spam filtering last month (~573 hours here). Or if you want, the total CPU time your antispam wasted analyzing incoming emails from facebook (~14.5 hours). But it's definitively a very complex software, and you have to invest a great deal of time in order to get value (analytics designed for you) from what you paid for (the license fees).

I love Splunk, but it's way too expensive for me (and for the tax payers whose I use the money). So I'm currently giving Logstash a try and I'm quite happy about it.

Related posts

ZFS primarycache: all versus metadata

In my previous post, I wrote about tuning a ZFS storage for MySQL. For InnoDB storage engine, I've tuned the primarycache property so that only metadata would get cached by ZFS. It makes sense for this particular use, but in most cases you'll want to keep the default primarycache setting (all).
Here is a real world example showing how a non-MySQL workload is affected by this setting.

On a virtual server, 2 vCPU, 8 GB RAM, running FreeBSD 9.1-RELEASE-p7, I have a huge zpool of about 4 TB. It uses gzip compression, and stores 1.8TB of emails (compressratio 1.61x) and 1TB documents (compressratio 1.15x). Documents and emails have their own dataset, on the same zpool.
As it's a secondary backup server, isolated from production, I can easily make some tests.

I've launched clamscan (the binary part of ClamAV virus scanner) against a small branch of the email storage tree (about 1/1000 of total emails) and measured the zpool IOs, CPU usage and total runtime of the scan.
Before each run, I've rebooted the server to clear cache.
clamscan is set up so that every temporary files are written into a UFS2 filesystem (/tmp).

One run was made with property primarycache set to all, the other run was made with primarycache set to metadata.

Total runtime with default settings primarycache=all is less than 15 minutes, for 20518 files:

Scanned directories: 1
Scanned files: 20518
Infected files: 2
Data scanned: 7229.92 MB
Data read: 2664.59 MB (ratio 2.71:1)
Time: 892.431 sec (14 m 52 s)

Total runtime with default settings primarycache=metadata is more than 33 minutes:

Scanned directories: 1
Scanned files: 20518
Infected files: 2
Data scanned: 7229.92 MB
Data read: 2664.59 MB (ratio 2.71:1)
Time: 2029.921 sec (33 m 49 s)

zpool iostat every 5 seconds, with different primarycache settings, ~10 minutes range.

zpool IO stats

CPU usage for clamscan process, and for kernel{zio_read_intr_0} kernel thread. 5 seconds sampling, with different primarycache settings, ~10 minutes range.

CPU stats

In both tests, the server is freshly rebooted, cache is empty. Nevertheless, when primarycache=all the kernel{zio_read_intr_0} thread consumes very few CPU cycles, and the clamscan process run's more than twice as fast as the same process with primarycache=metadata.
More importantly, clamscan manages to read the exact same amount of data in both tests, using 10 times less IO throughput when primarycache is set to all.

There is something weird. Let's make another test:

I create 2 brand new datasets, both with primarycache=none and compression=lz4, and I copy in each one a 4.8GB file (2.05x compressratio). Then I set primarycache=all on the first one, and primarycache=metadata on the second one.
I cat the first file into /dev/null with zpool iostat running in another terminal. And finally, I cat the second file the same way.

The sum of read bandwidth column is (almost) exactly the physical size of the file on the disk (du output) for the dataset with primarycache=all: 2.44GB.
For the other dataset, with primarycache=metadata, the sum of the read bandwidth column is ...wait for it... 77.95GB.

There is some sort of voodoo under the hood that I can't explain. Feel free to comment if you have any idea on the subject.

A FreeBSD user has posted an interesting explanation to this puzzling behavior in FreeBSD forums:

clamscan reads a file, gets 4k (pagesize?) of data and processes it, then it reads the next 4k, etc.

ZFS, however, cannot read just 4k. It reads 128k (recordsize) by default. Since there is no cache (you've turned it off) the rest of the data is thrown away.

128k / 4k = 32
32 x 2.44GB = 78.08GB

Damnit.

Related posts